Aggressor's Mission Builder
If your idea of a fun Saturday afternoon includes things like: pulling out your own hair, throwing your laptop out of a window or catching a glimpse of success only to have it taken away 2 minutes later, then you've come to the right place. So you want to make your own missions? Well you can, technically, but at the same time you can't. Welcome to my guide on the mission builder and why you probably shouldn't use it for now. The mission builder was for a long time meant to be for me only. This means there are some serious bugs getting in the way of a smooth user experience. Because it is part of the game and available for players, I'll go over how to use it here to hopefully make the experience a bit better for those who want to give it a go. We'll start off simple and go from there to more advanced concepts.
Starting Off
Before you do anything else, you need to be in a mission. Open the side panel by pressing Escape and click on the file icon at the top. You'll see a bunch of settings you can mostly ignore except for one: the world option. Click on it to set it to "prefab". The procedural mode will just break the game as far as I'm aware. Select a map from the dropdown and it will load immediately. For this tutorial I will go with the Drylake map since it offers perfectly flat ground in the center which will be important for when we make a simple airport later.
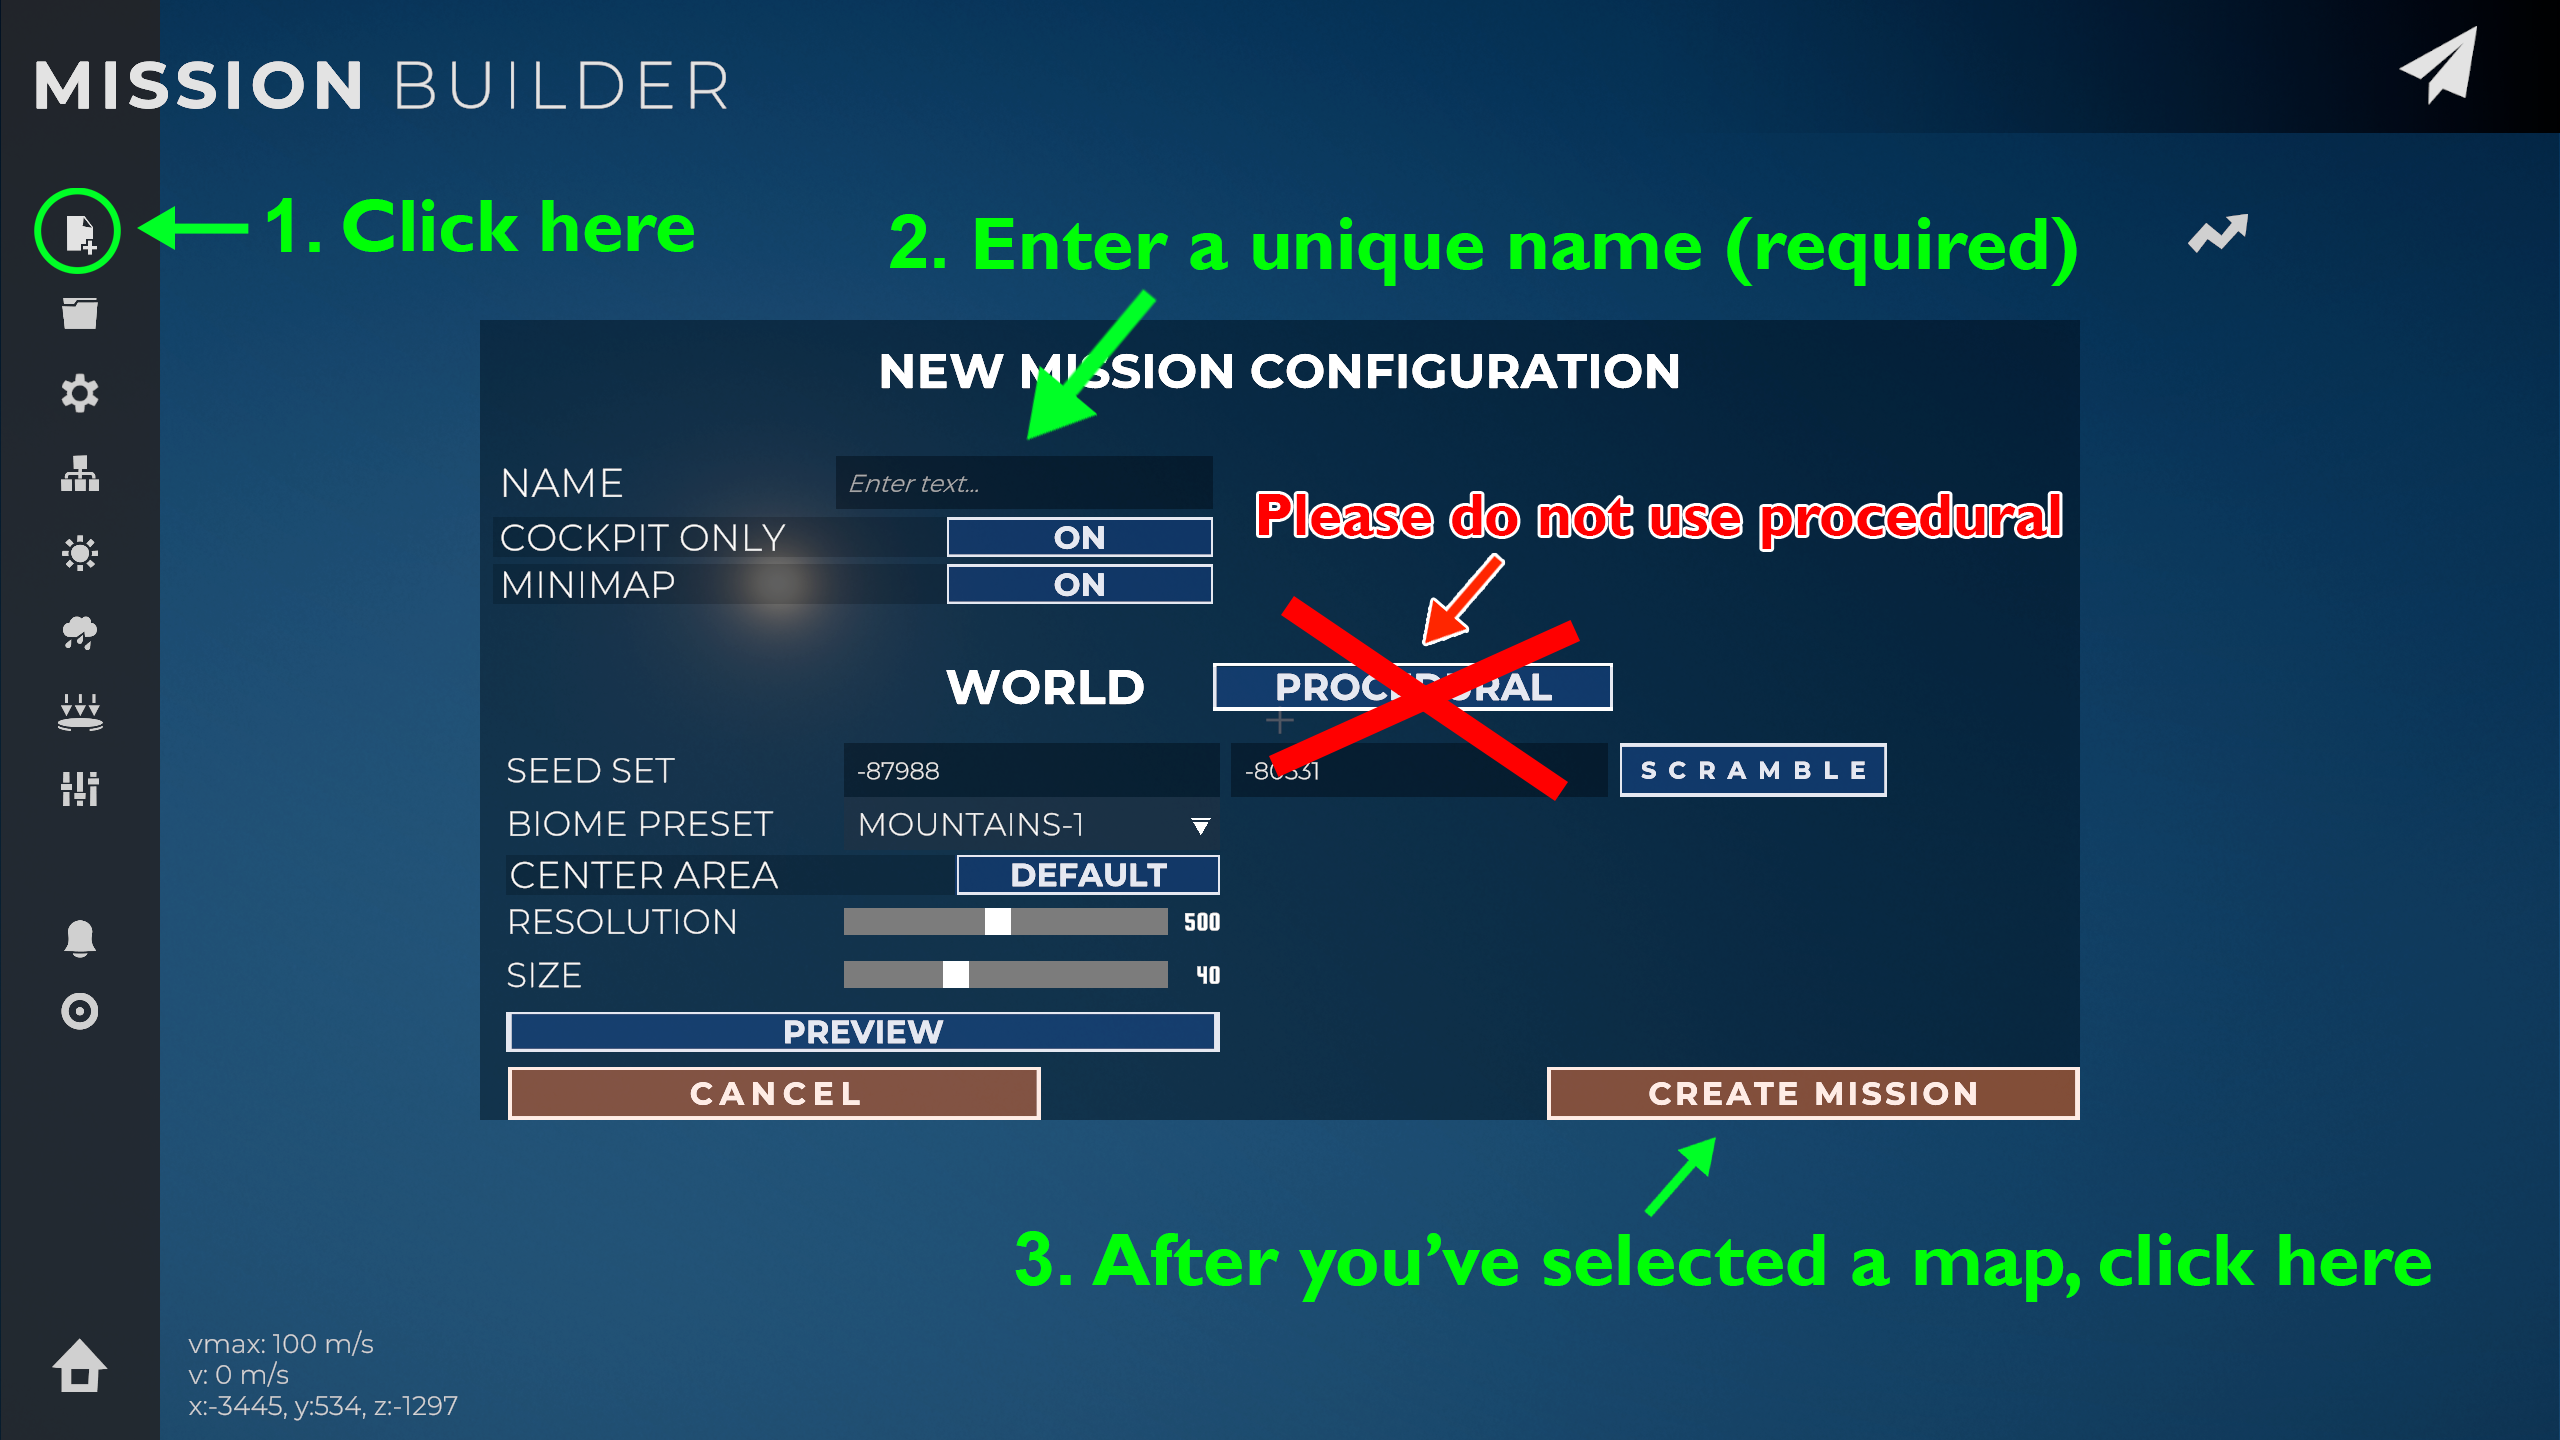 Missions are stored in C:/users/(name)/appdata/locallow/Flashpoint/Aggressor/customs/missions
Adding the Player Aircraft
Congratulations, you have a mission environment now! Use WASD to move around and your mouse to look. Space and shift control up/down movement. Holding "F" makes your speed increase 10x.
Before a mission can be flown, it is absolutely necessary to assign a player aircraft. The mission wont be playable if you don't. Don't worry, after you've set the player aircraft for the first time, the builder will from that point onwards ensure there is always at least one player. That means you're free to delete the player aircraft later, as the player will just be automatically reassigned to another aircraft. You cannot delete an aircraft if it's the only one left in the mission, because that would mean there is no player. The mission builder guards against this by not letting you.
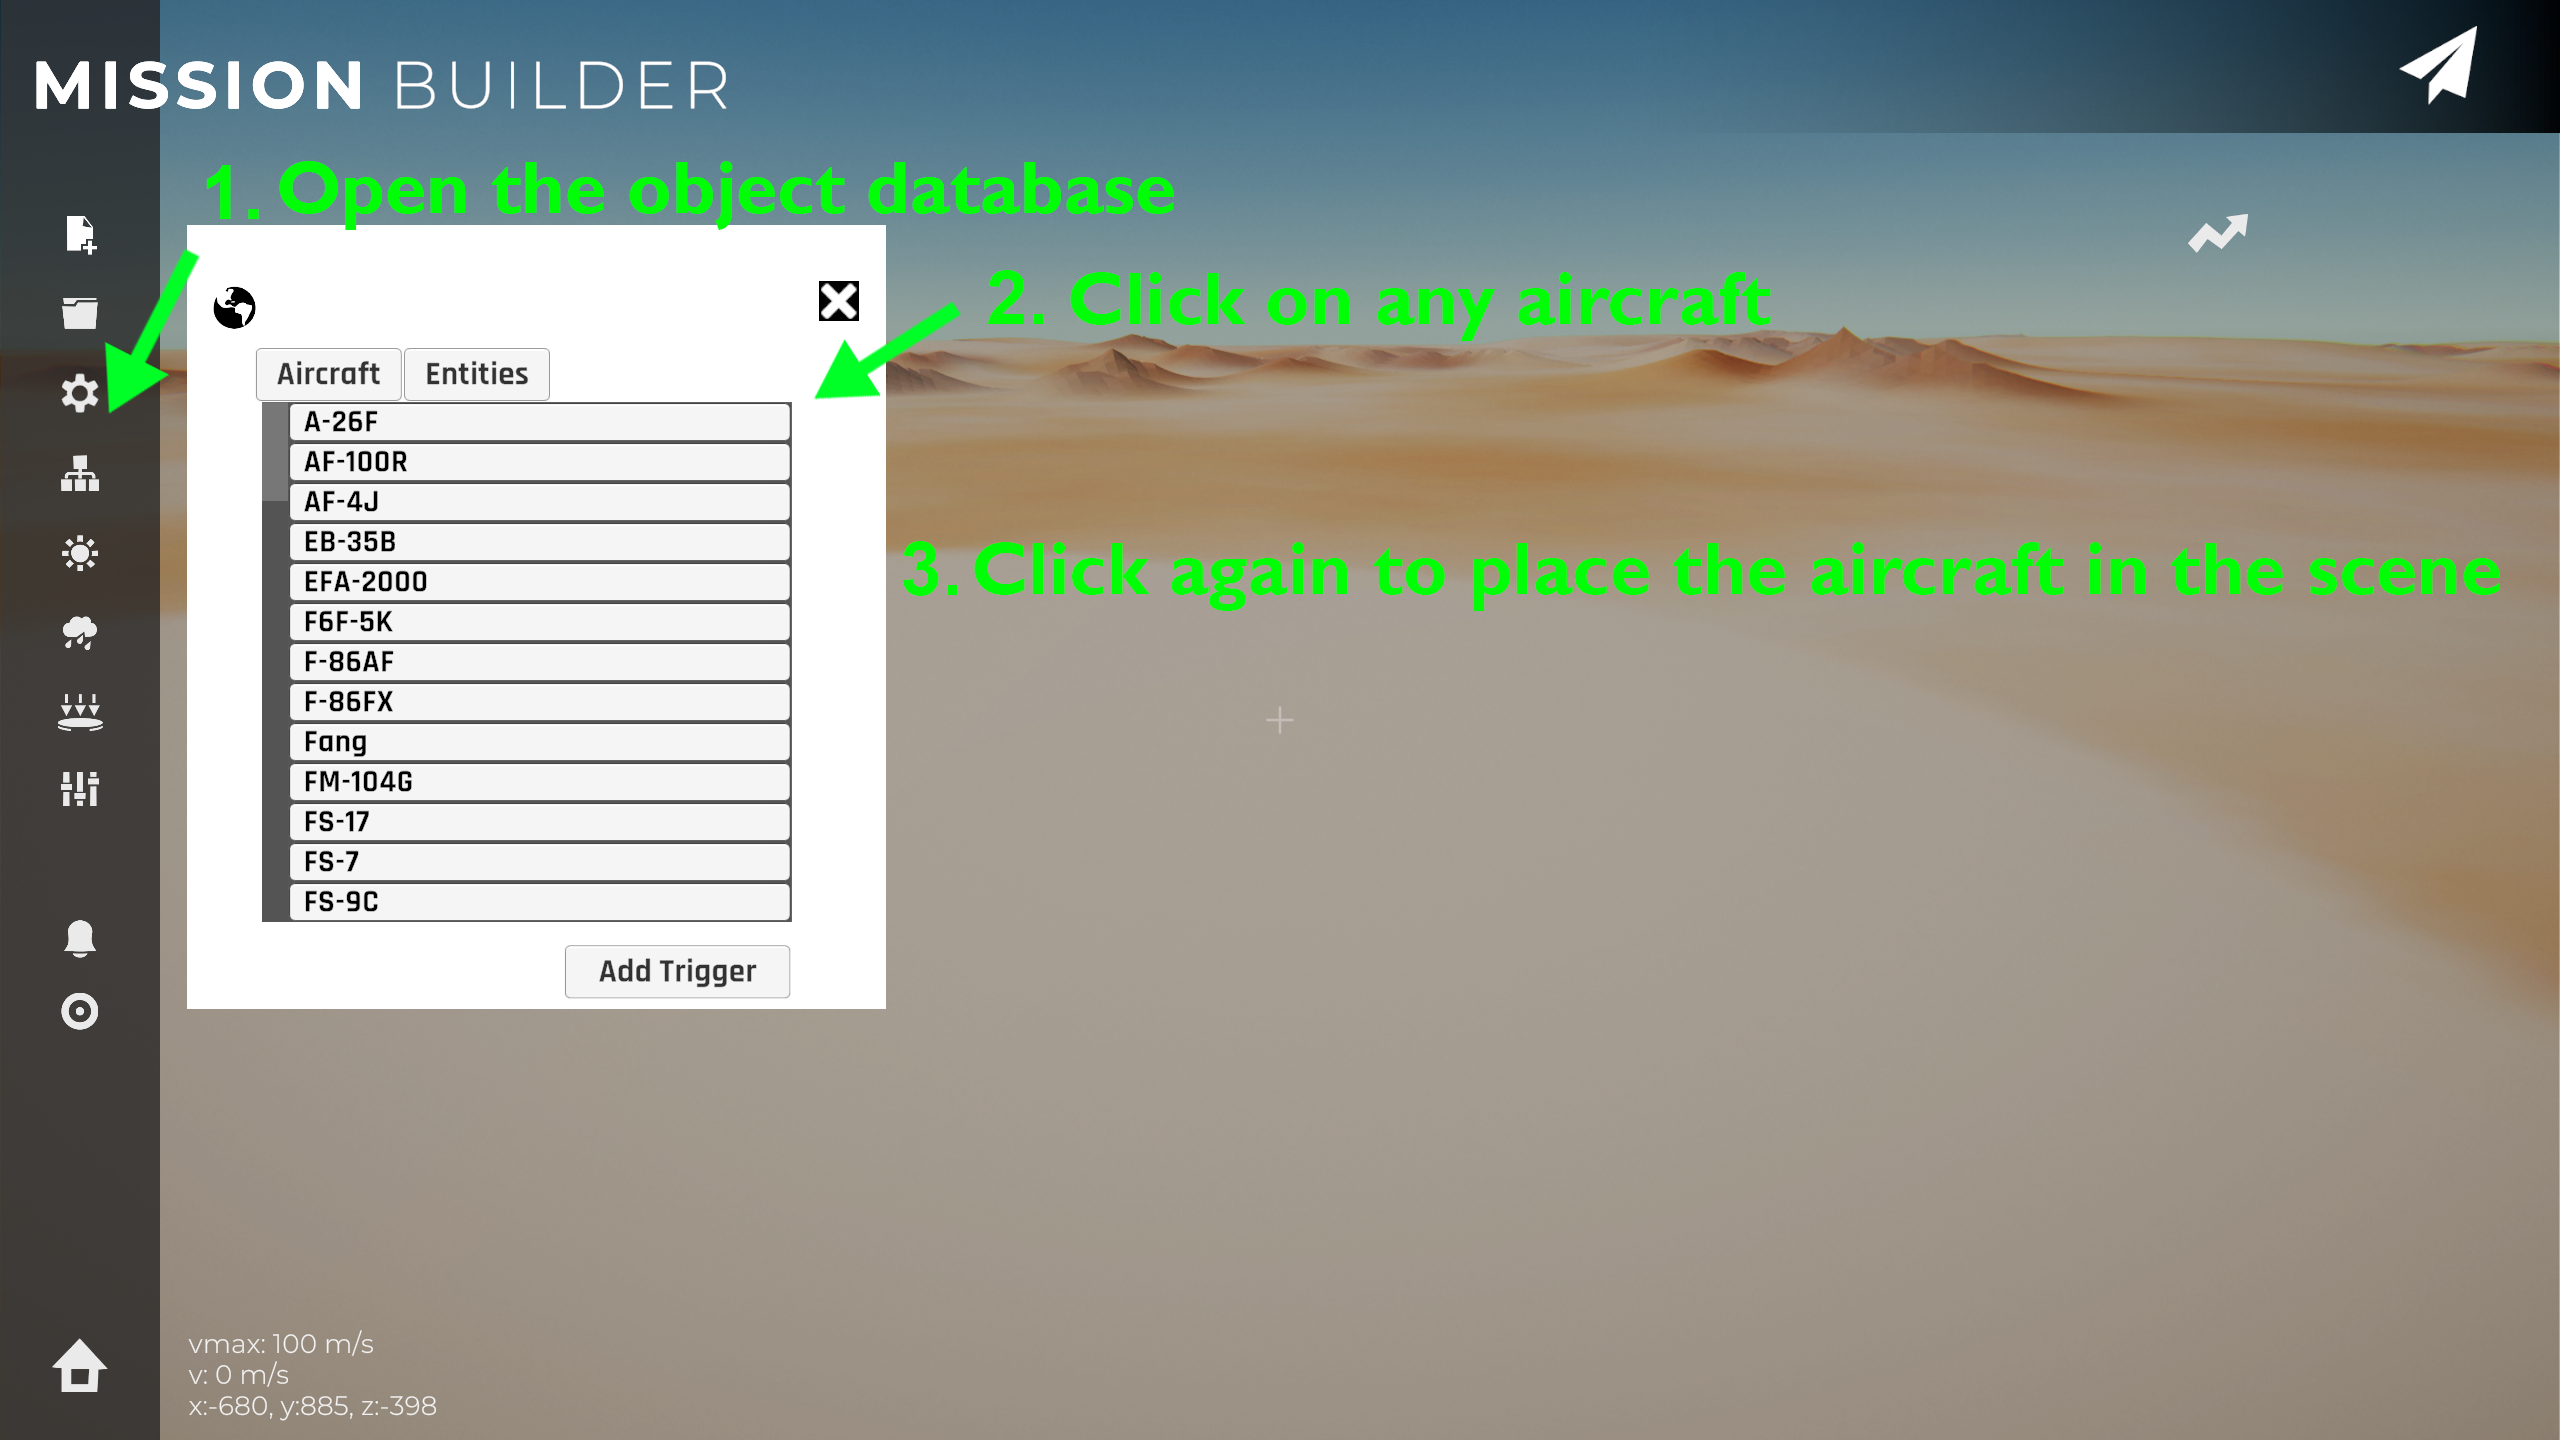 Press esc to open/close the side panel, and generally to exit any UI panel for placing/editing stuff.
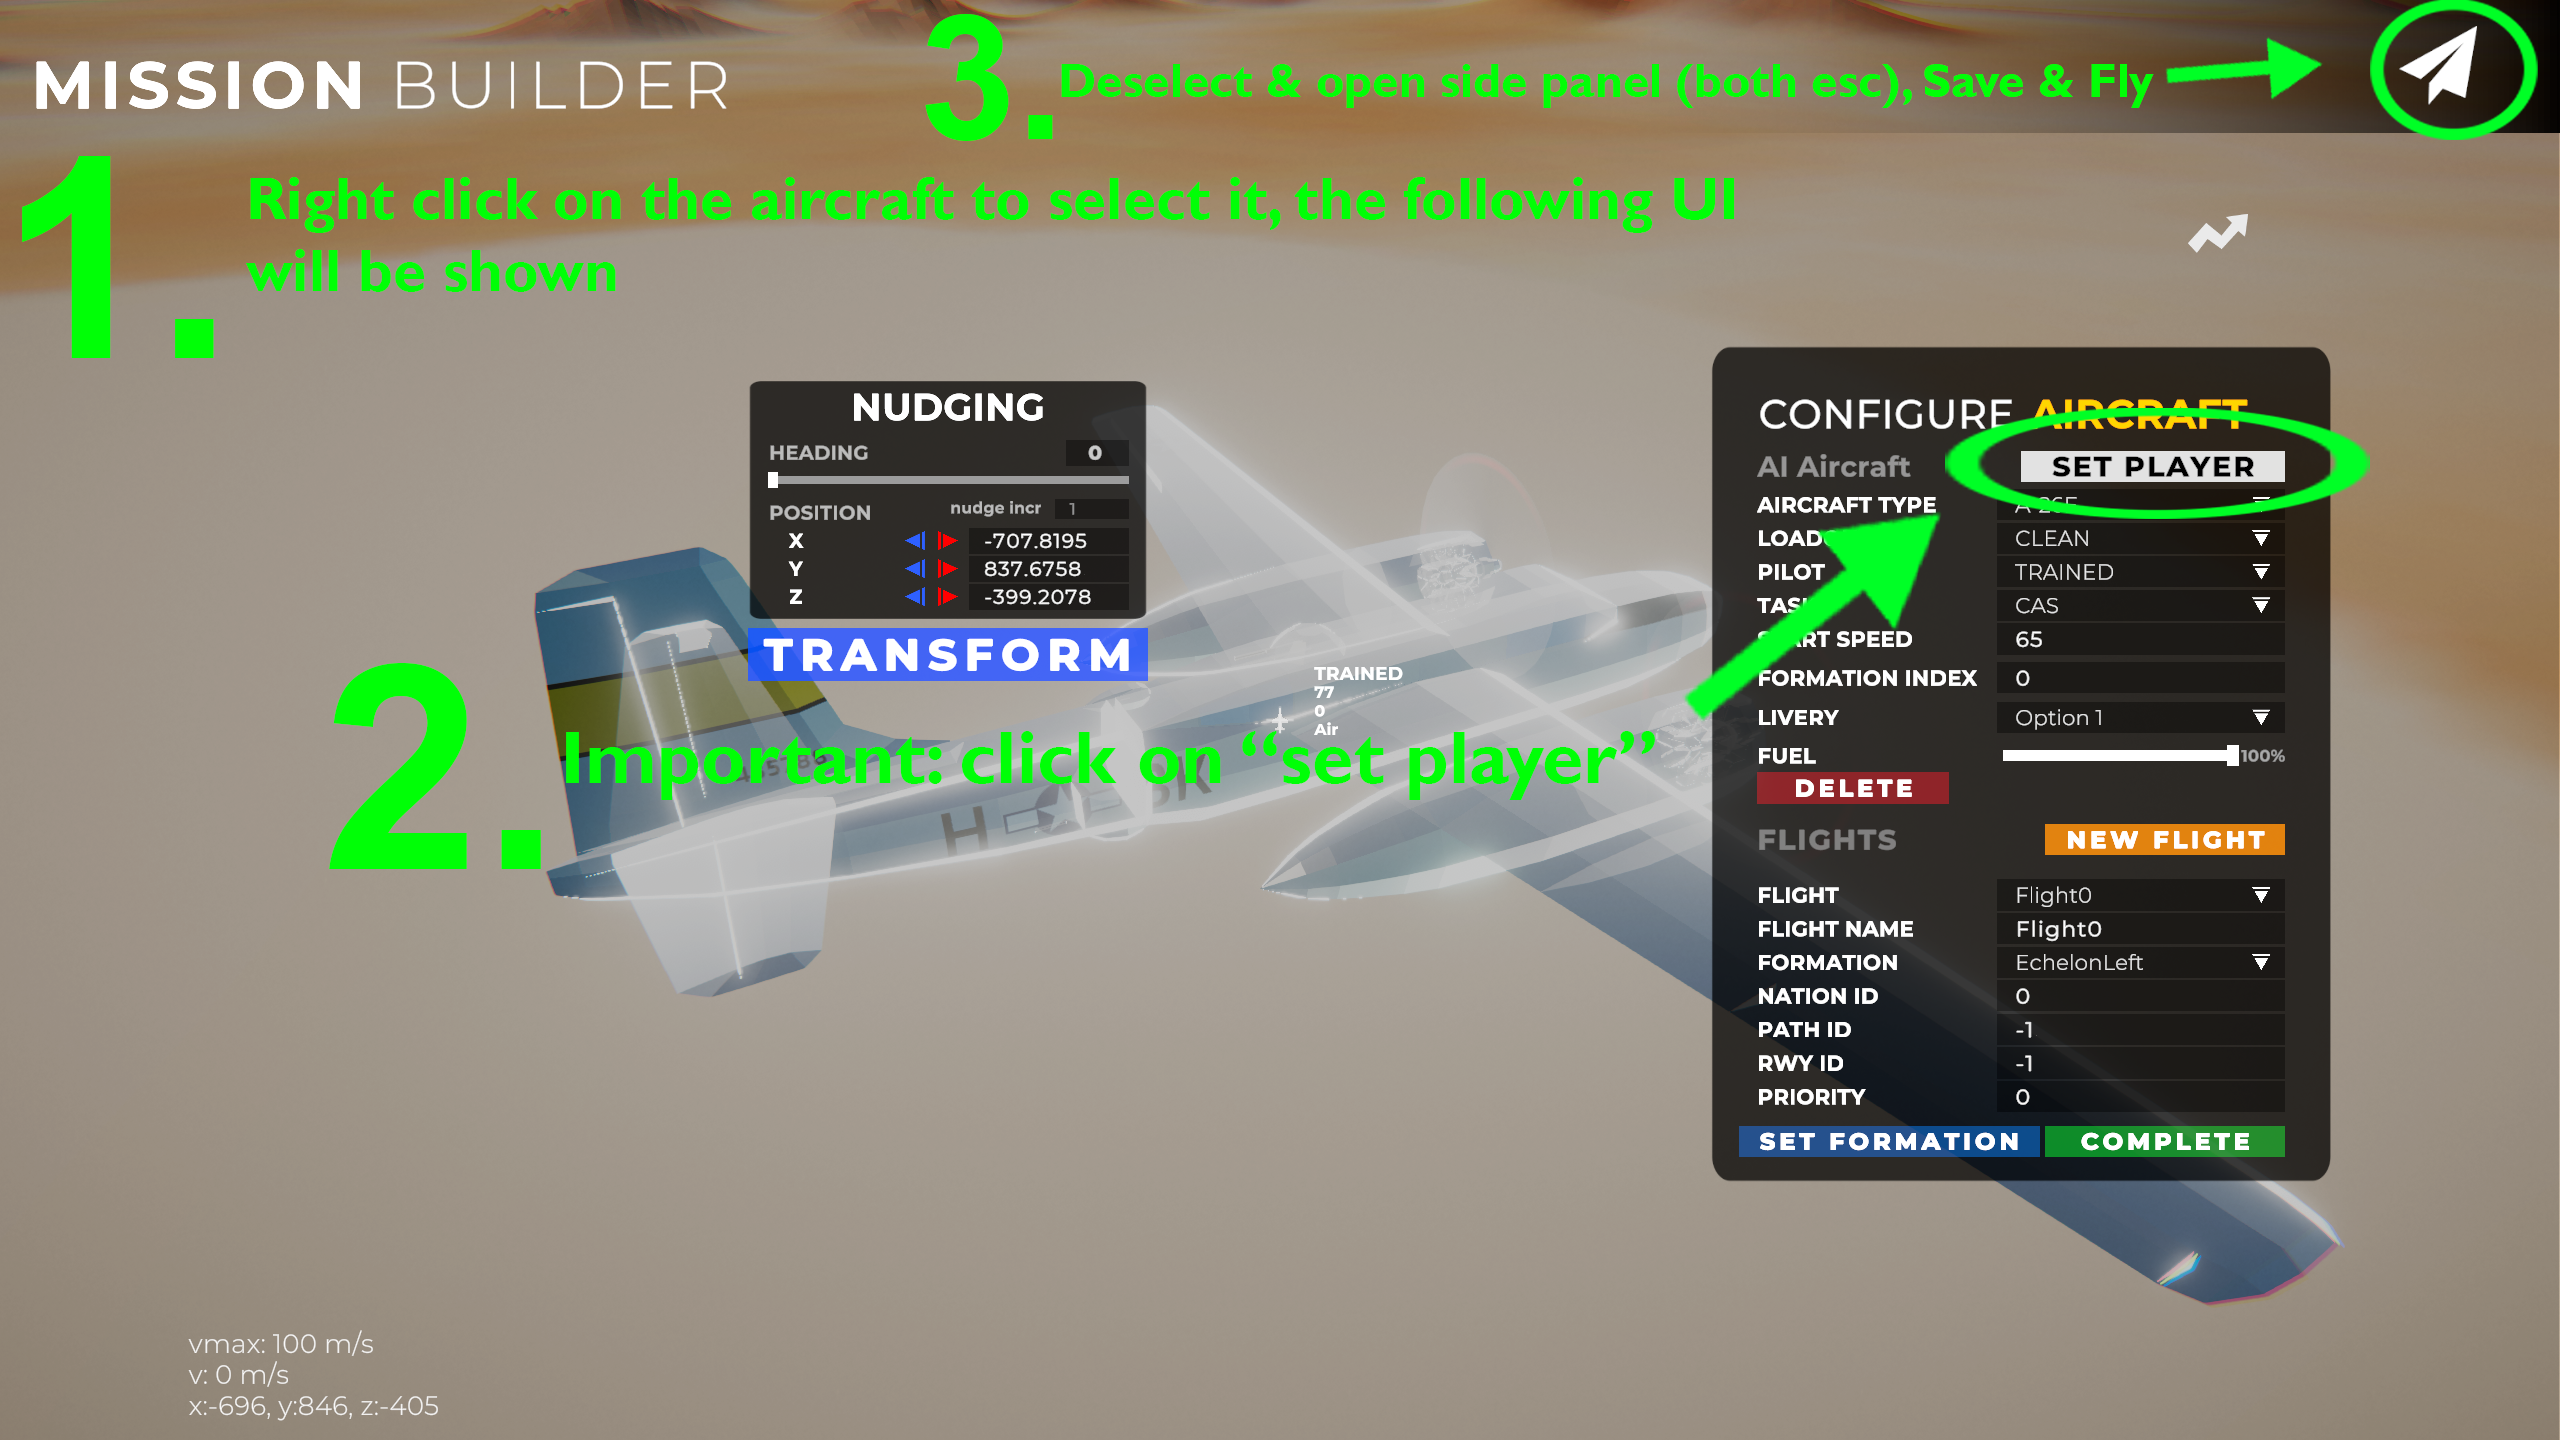 The paper plane icon saves and then begins the mission immediately. Only press it after you've assigned the player.
Creating an Airport
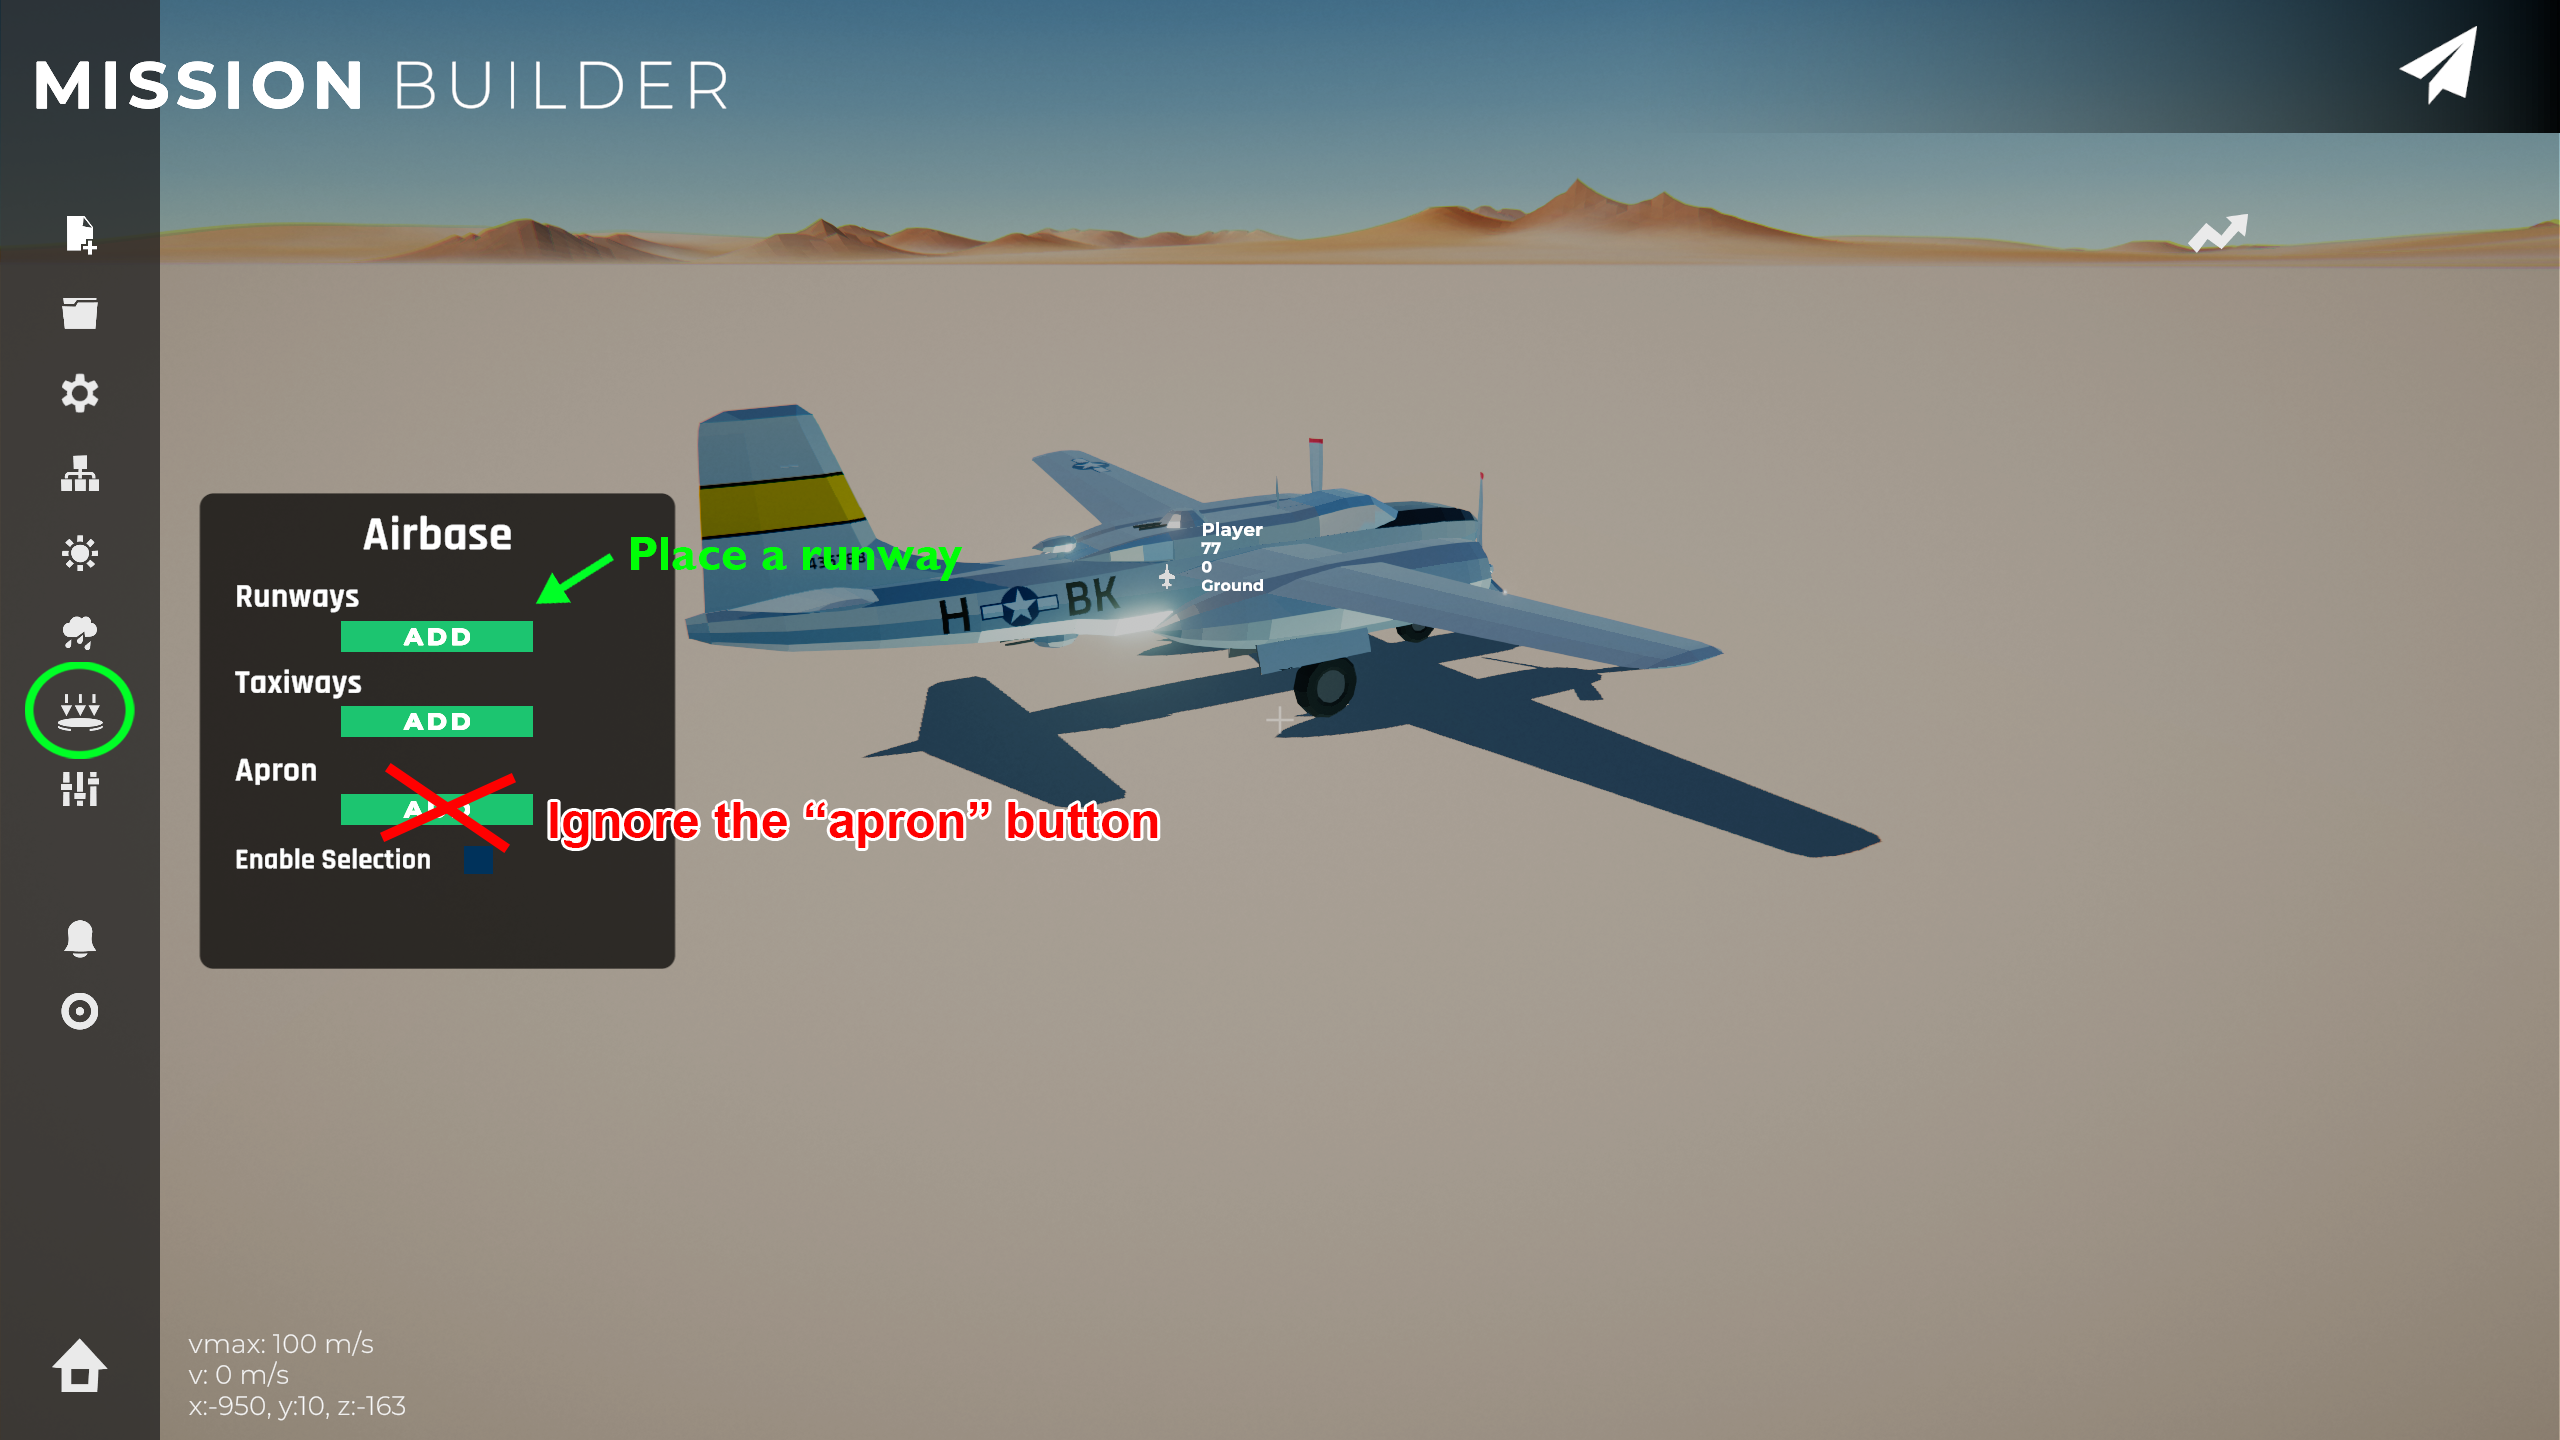
Now to get right into the fun (and tricky) part. Creating an airport is fairly straightforward but it has some gotcha's you need to be aware of. By the end of this tutorial we should have a simple airport with a single AI aircraft taking off from it. Get started by placing a runway (make sure you place it on the ground, all ramp and taxiway objects need to be level in order for it to work). Runways and aprons are considered anchor objects. Taxiways will snap to runways/aprons but not the other way around. Place a single runway on the ground. Right click places down the runway.
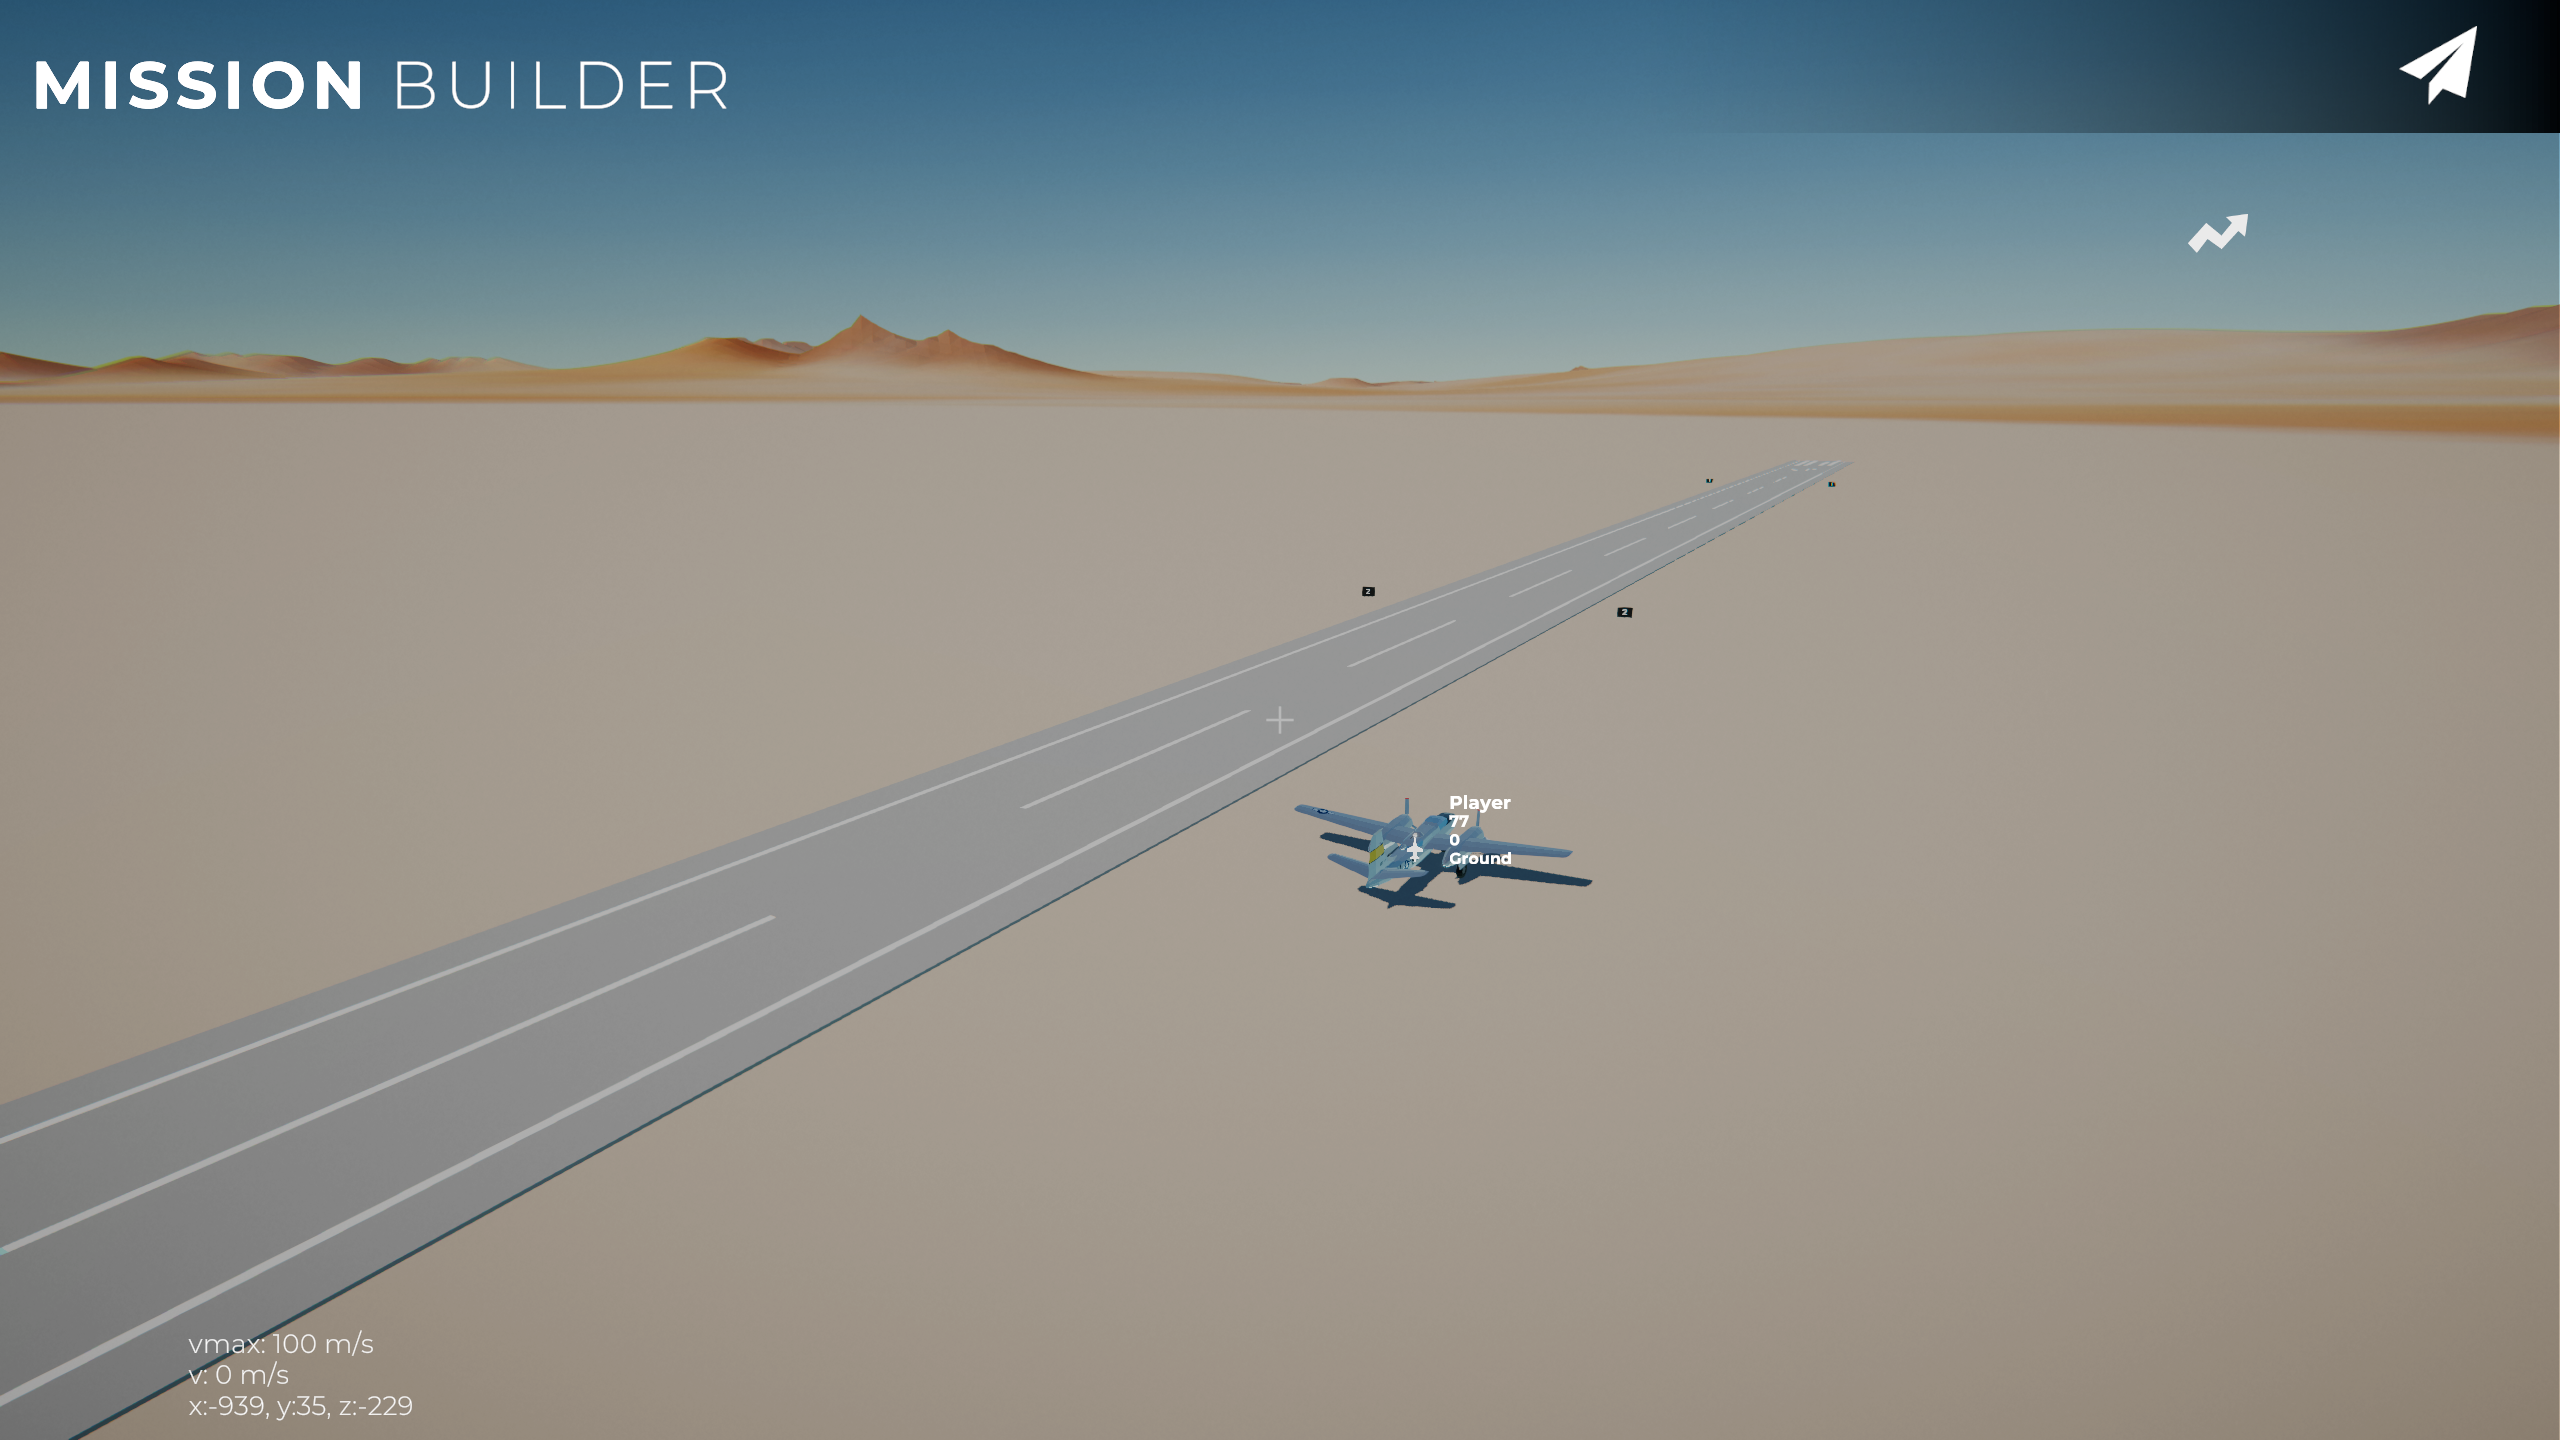 Your scene should look like this now. Once again the whole thing can fail if the runway isn't placed on the ground. It could be hovering 1m above ground and that will mess up the taxiway connections we will place later.
Essential Airport Objects
To get a functional airport that works and is not just a visual, you need at the very least: 1) a runway 2) a tower 3) an apron 4) a connection from the runway to that apron 5) a trigger of type "AirbaseTrigger" placed near the center of the airport and set with a radius so as to encompass all airport entities/aircraft.
Tower
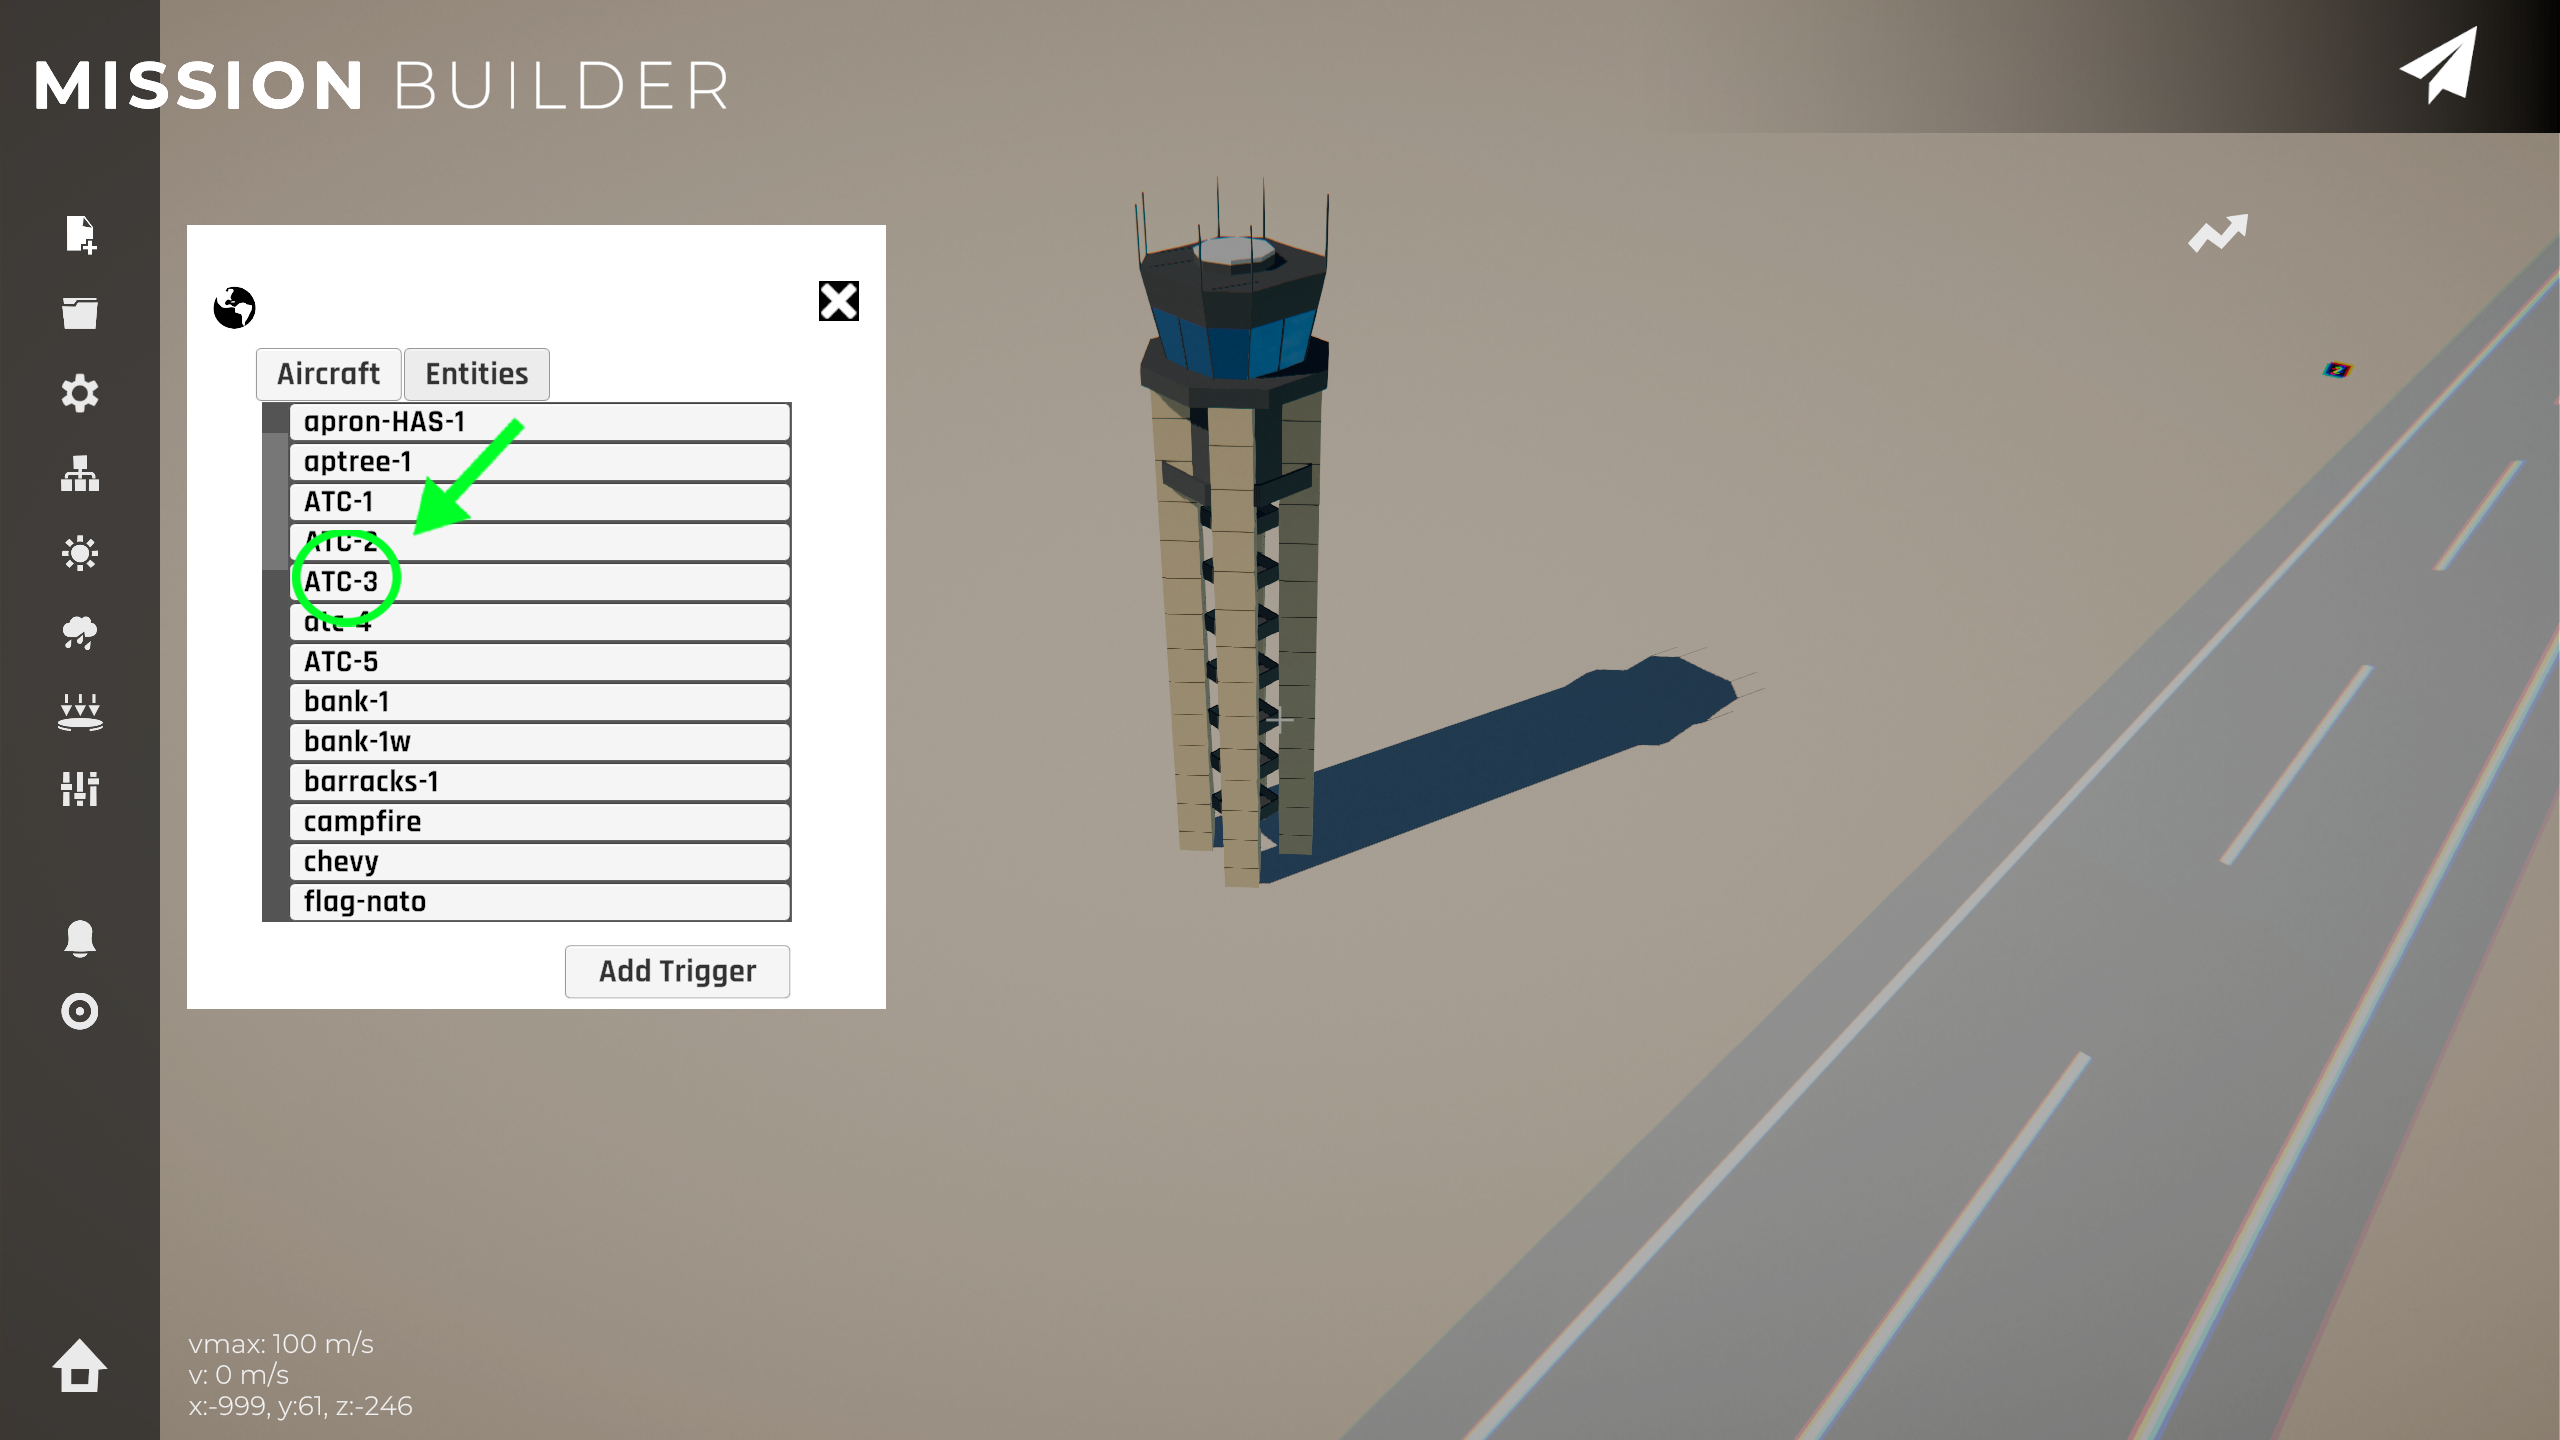
Open up the object database again and pick a tower of your choosing and place it down into the scene, preferably near the main runway or center of the airport. Towers are simply called atc-x where x is the specific 3d model of tower.
Apron
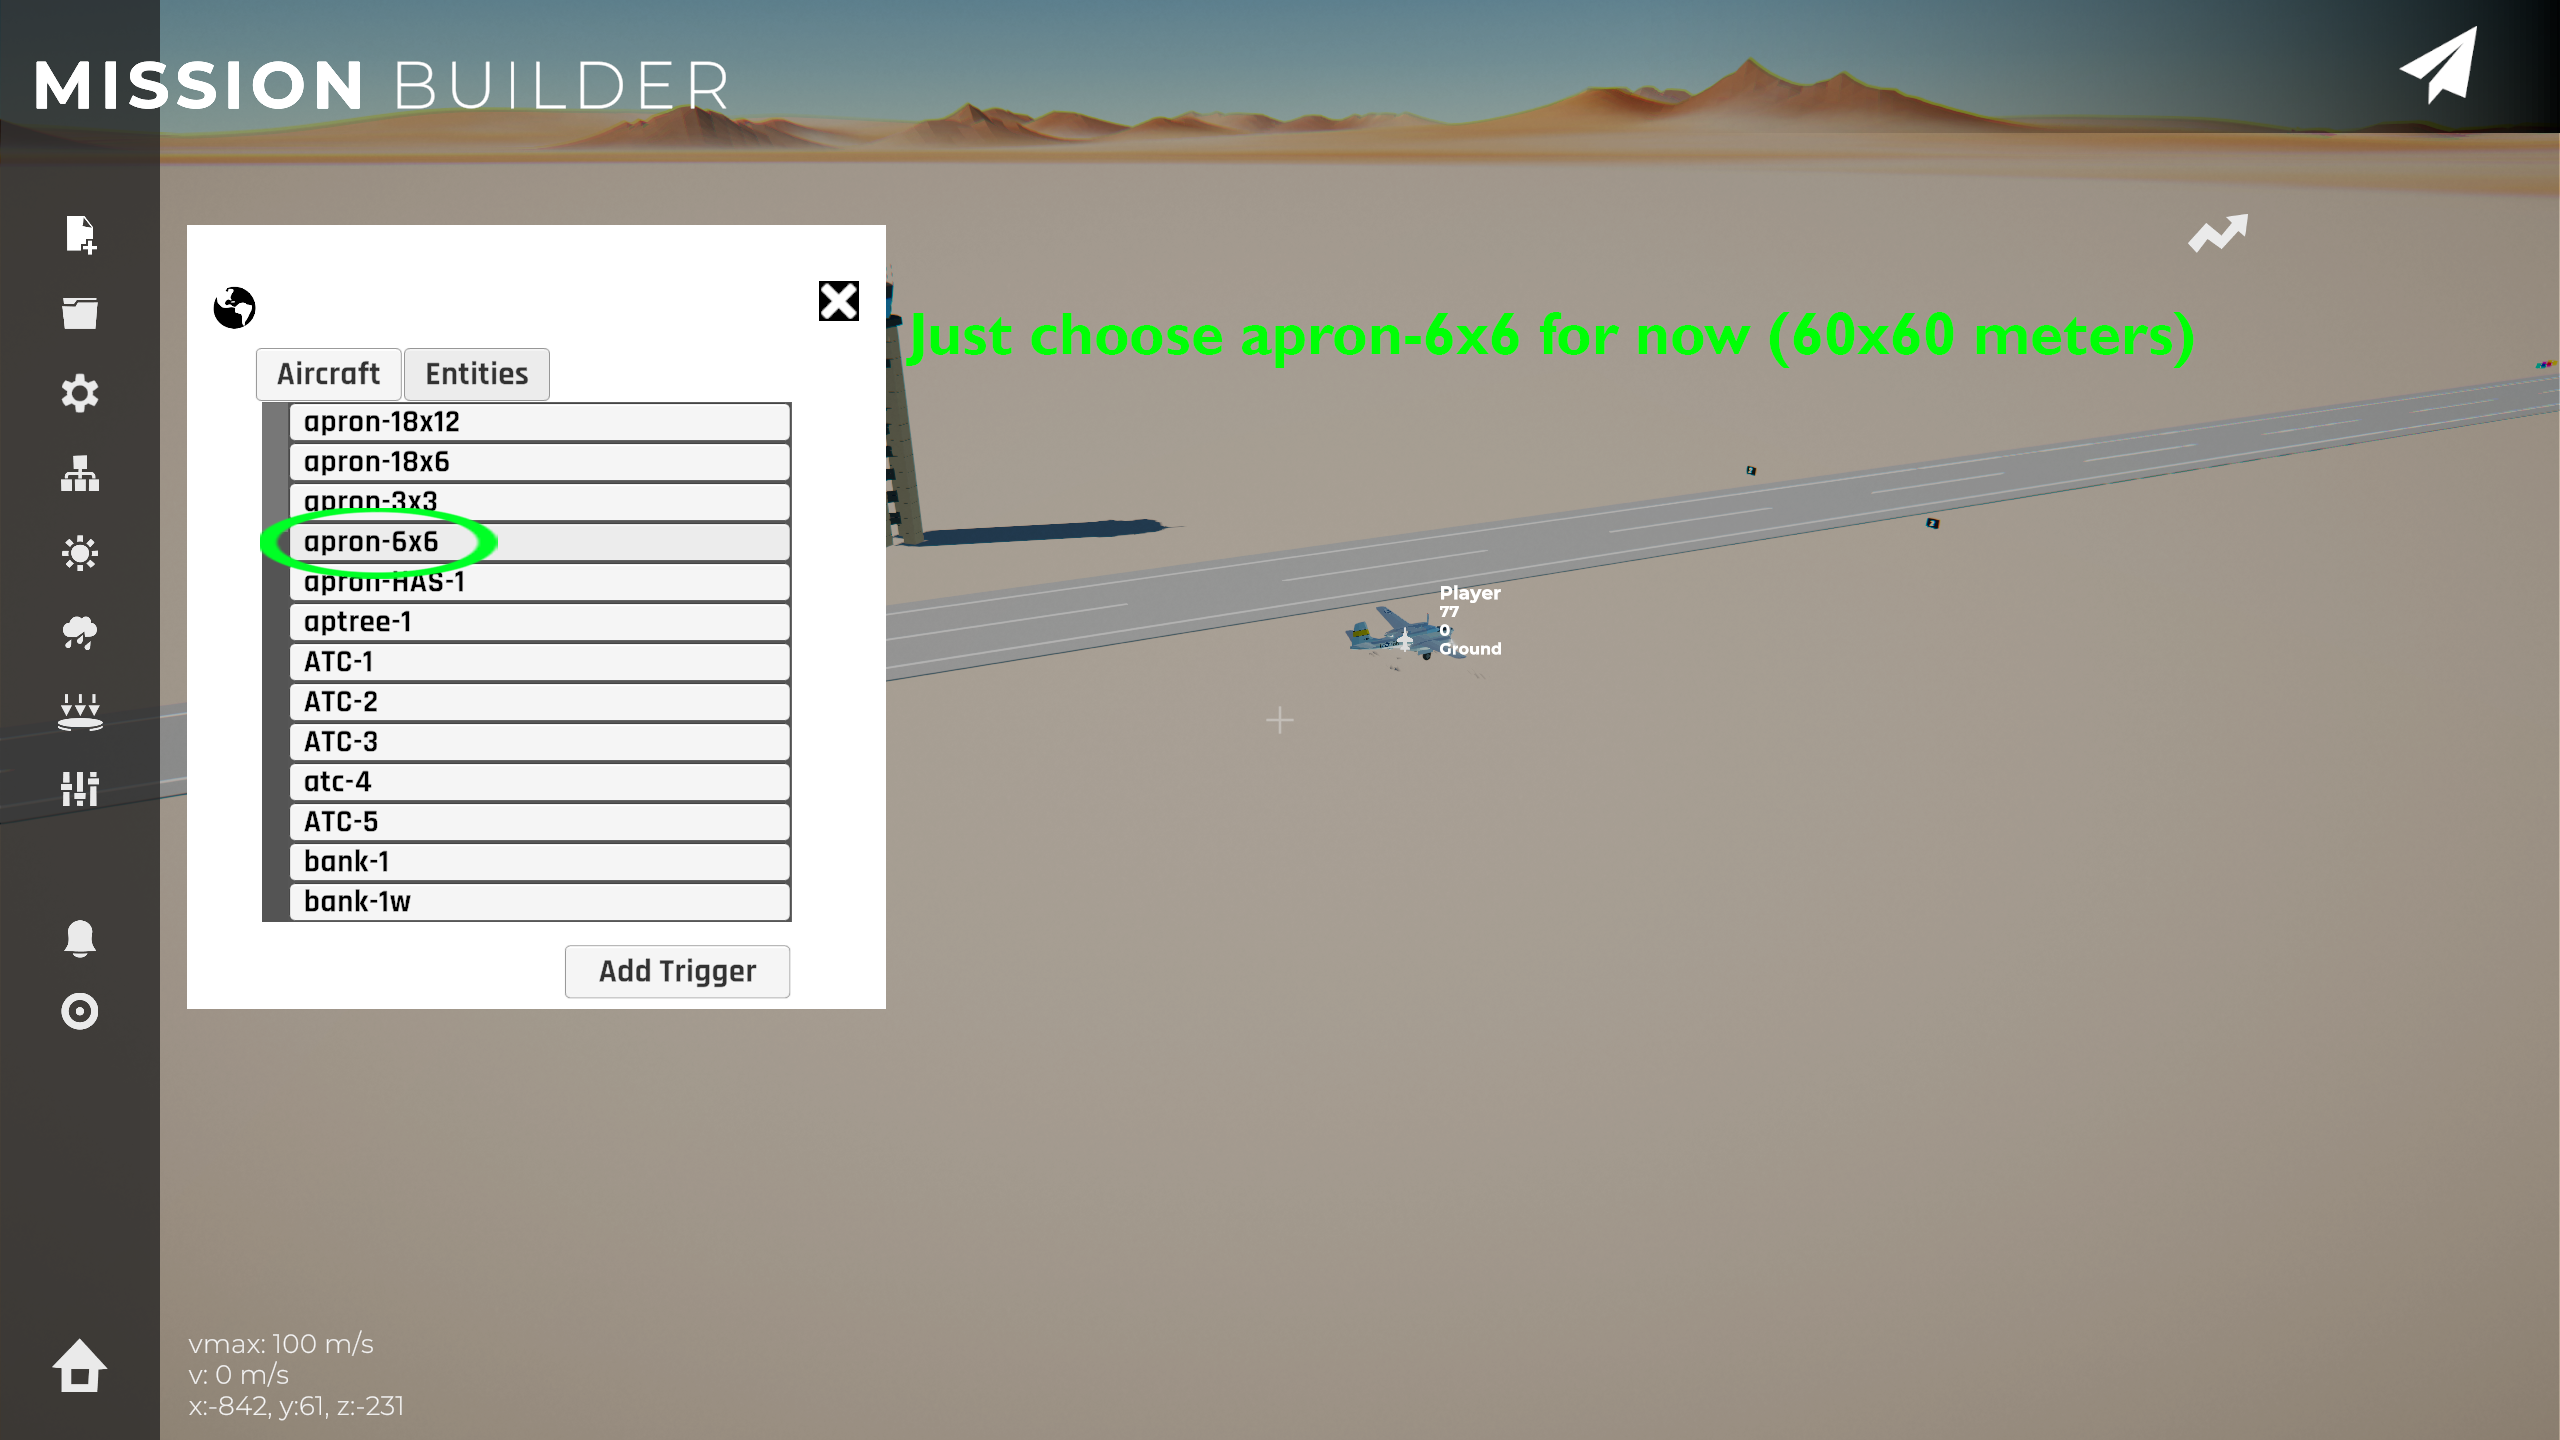
To make an apron, you need to locate one in the object database and place it down where you like. When dragging an entity/aircraft, you can use Q/E to rotate it at 10 deg increments. Its advised you align one of it's main cardinal axes with the runway direction to make it easier to join the taxiway, but really you can place it however you want as long as it's within the confines of the airport. These confines are later defined by the trigger. Make sure the apron is also placed on the ground (same level as the runway).
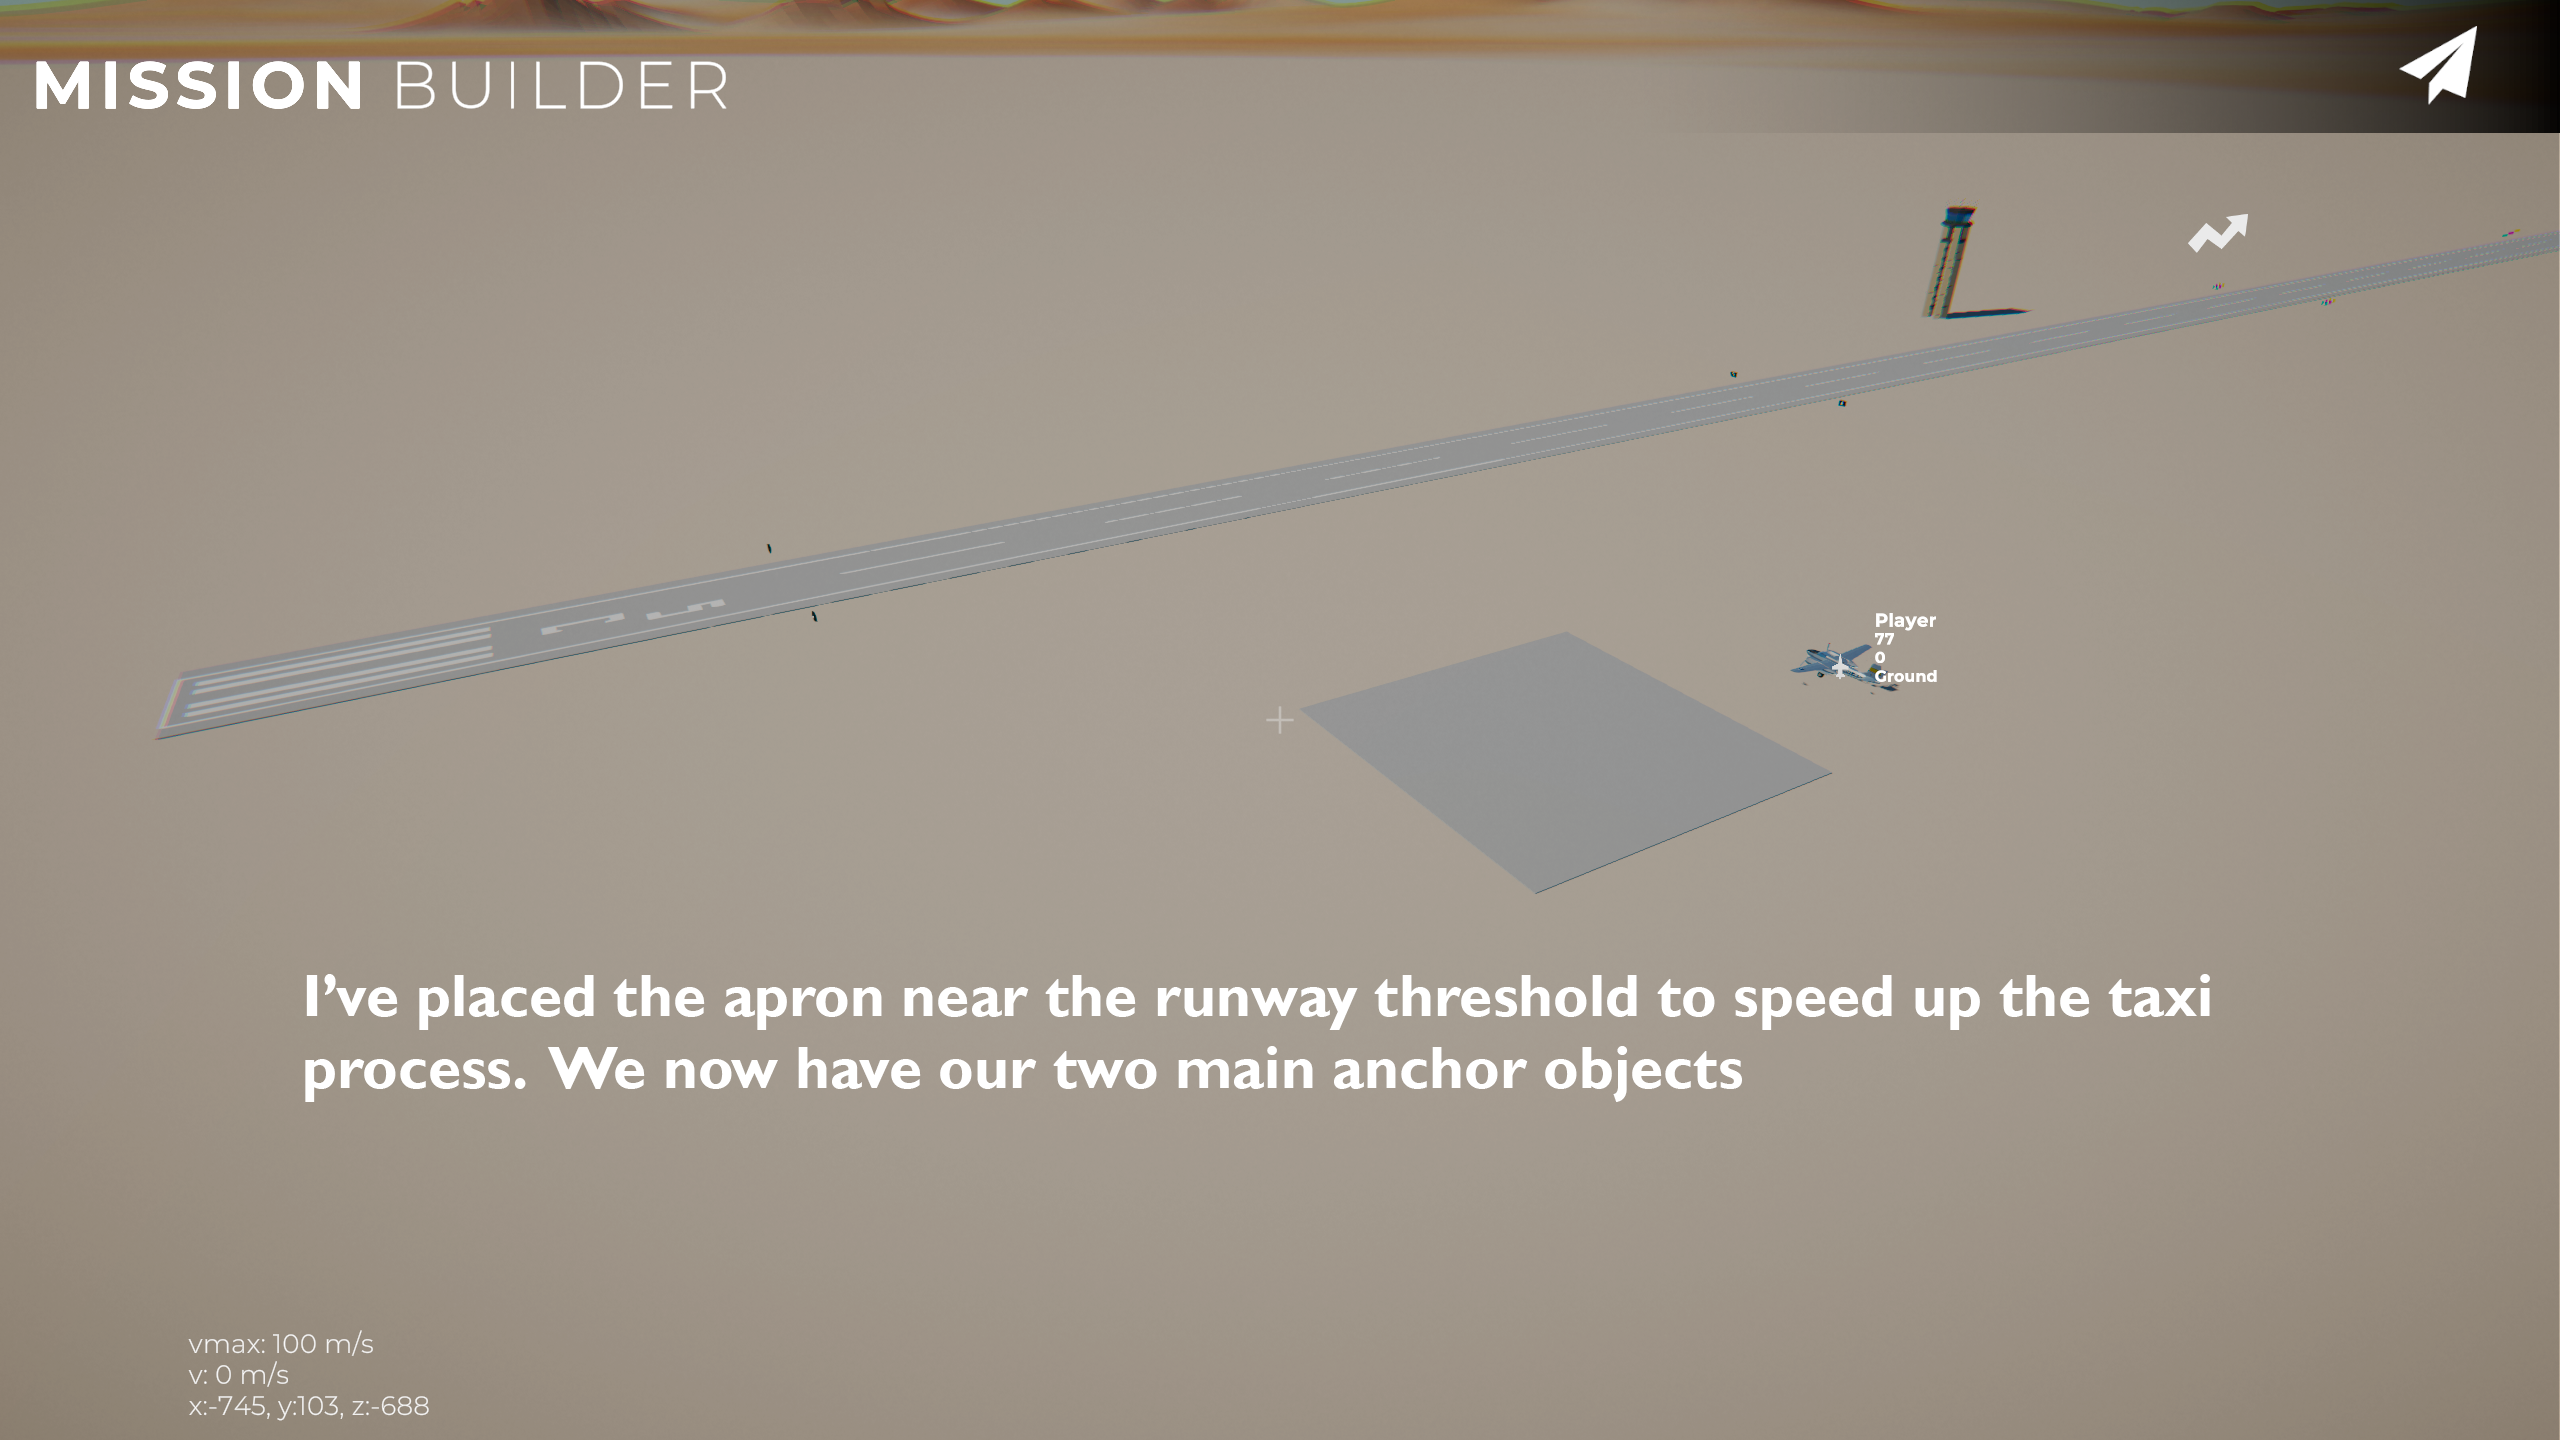
It's advisable at this point that you save your progress. Open sidebar (esc) and press fly (paperclip icon) to do so. You can simply exit the flight to return to the mission builder and your mission will still be there, saved.
Taxiway Connection
This is the more tricky part, but let's just go for it: open the sidebar panel and navigate to the same location you got the runway from and press the taxiway button. Place down the taxiway wherever you like (as long as its grounded). It's position does not really matter because you are able to edit the position of it's handles. Do not place the taxiway on top of either the apron or runway to avoid getting the wrong y-position.
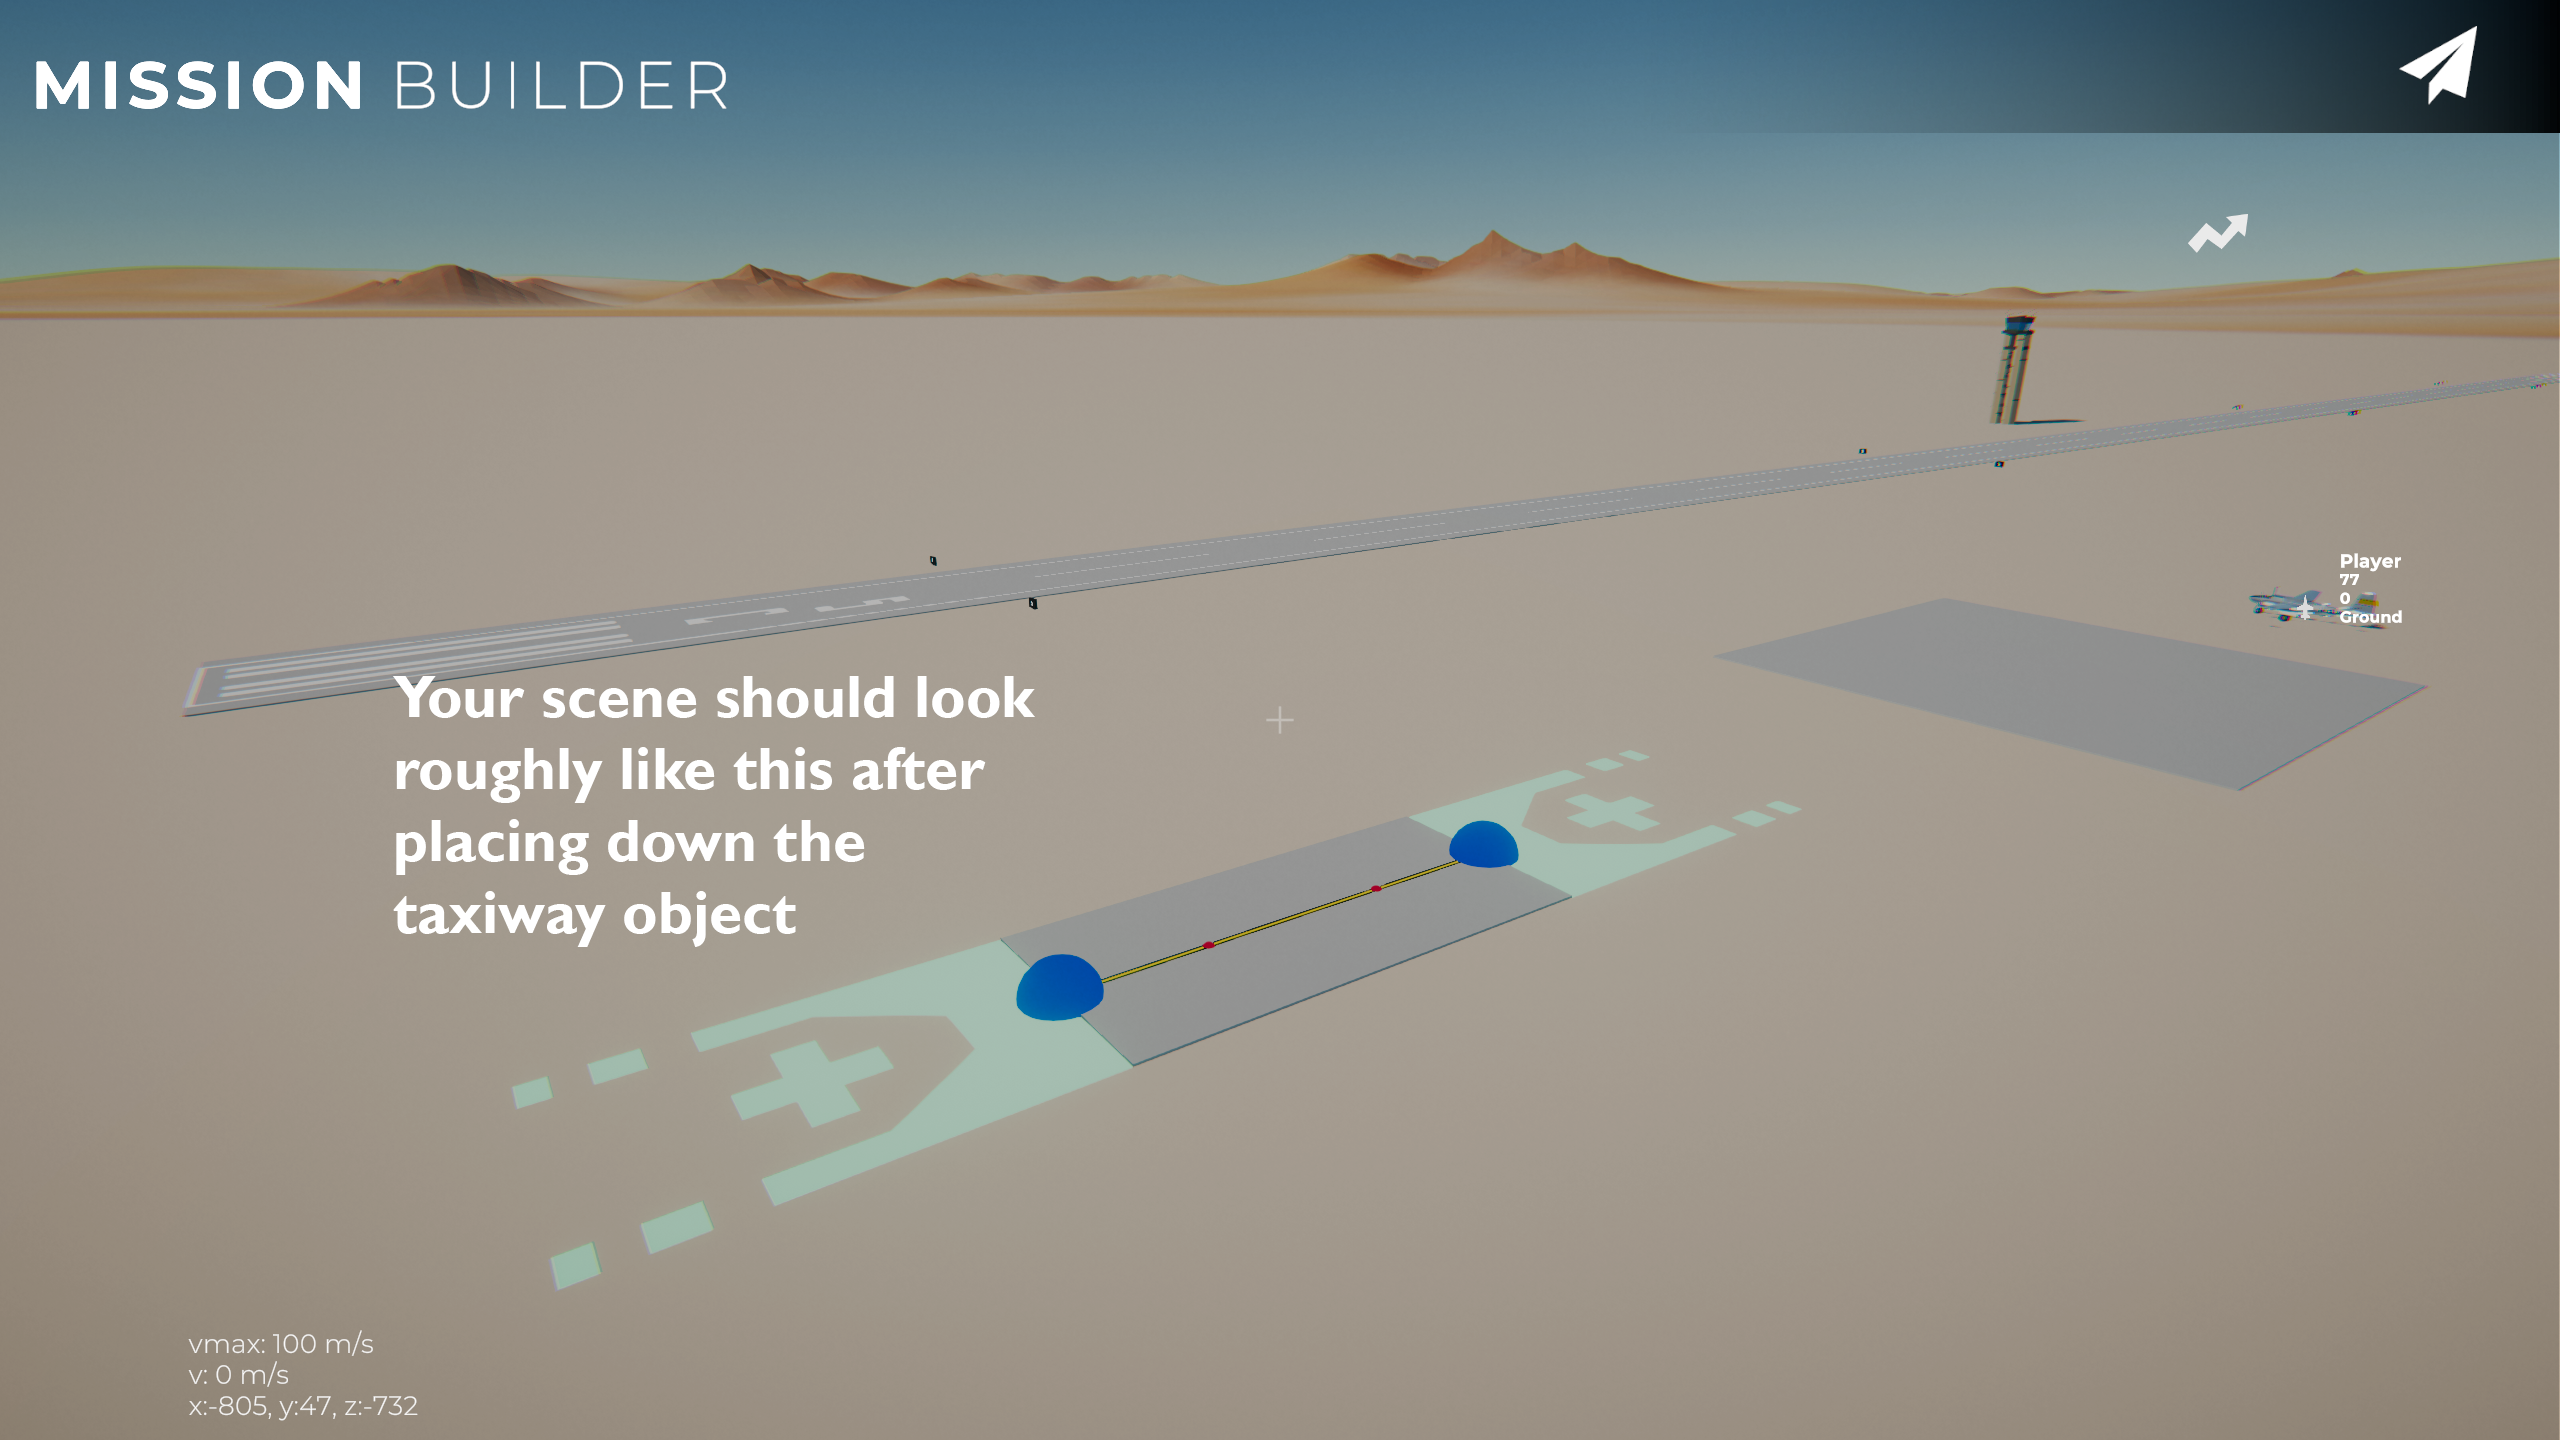
Editing Taxiway Handles
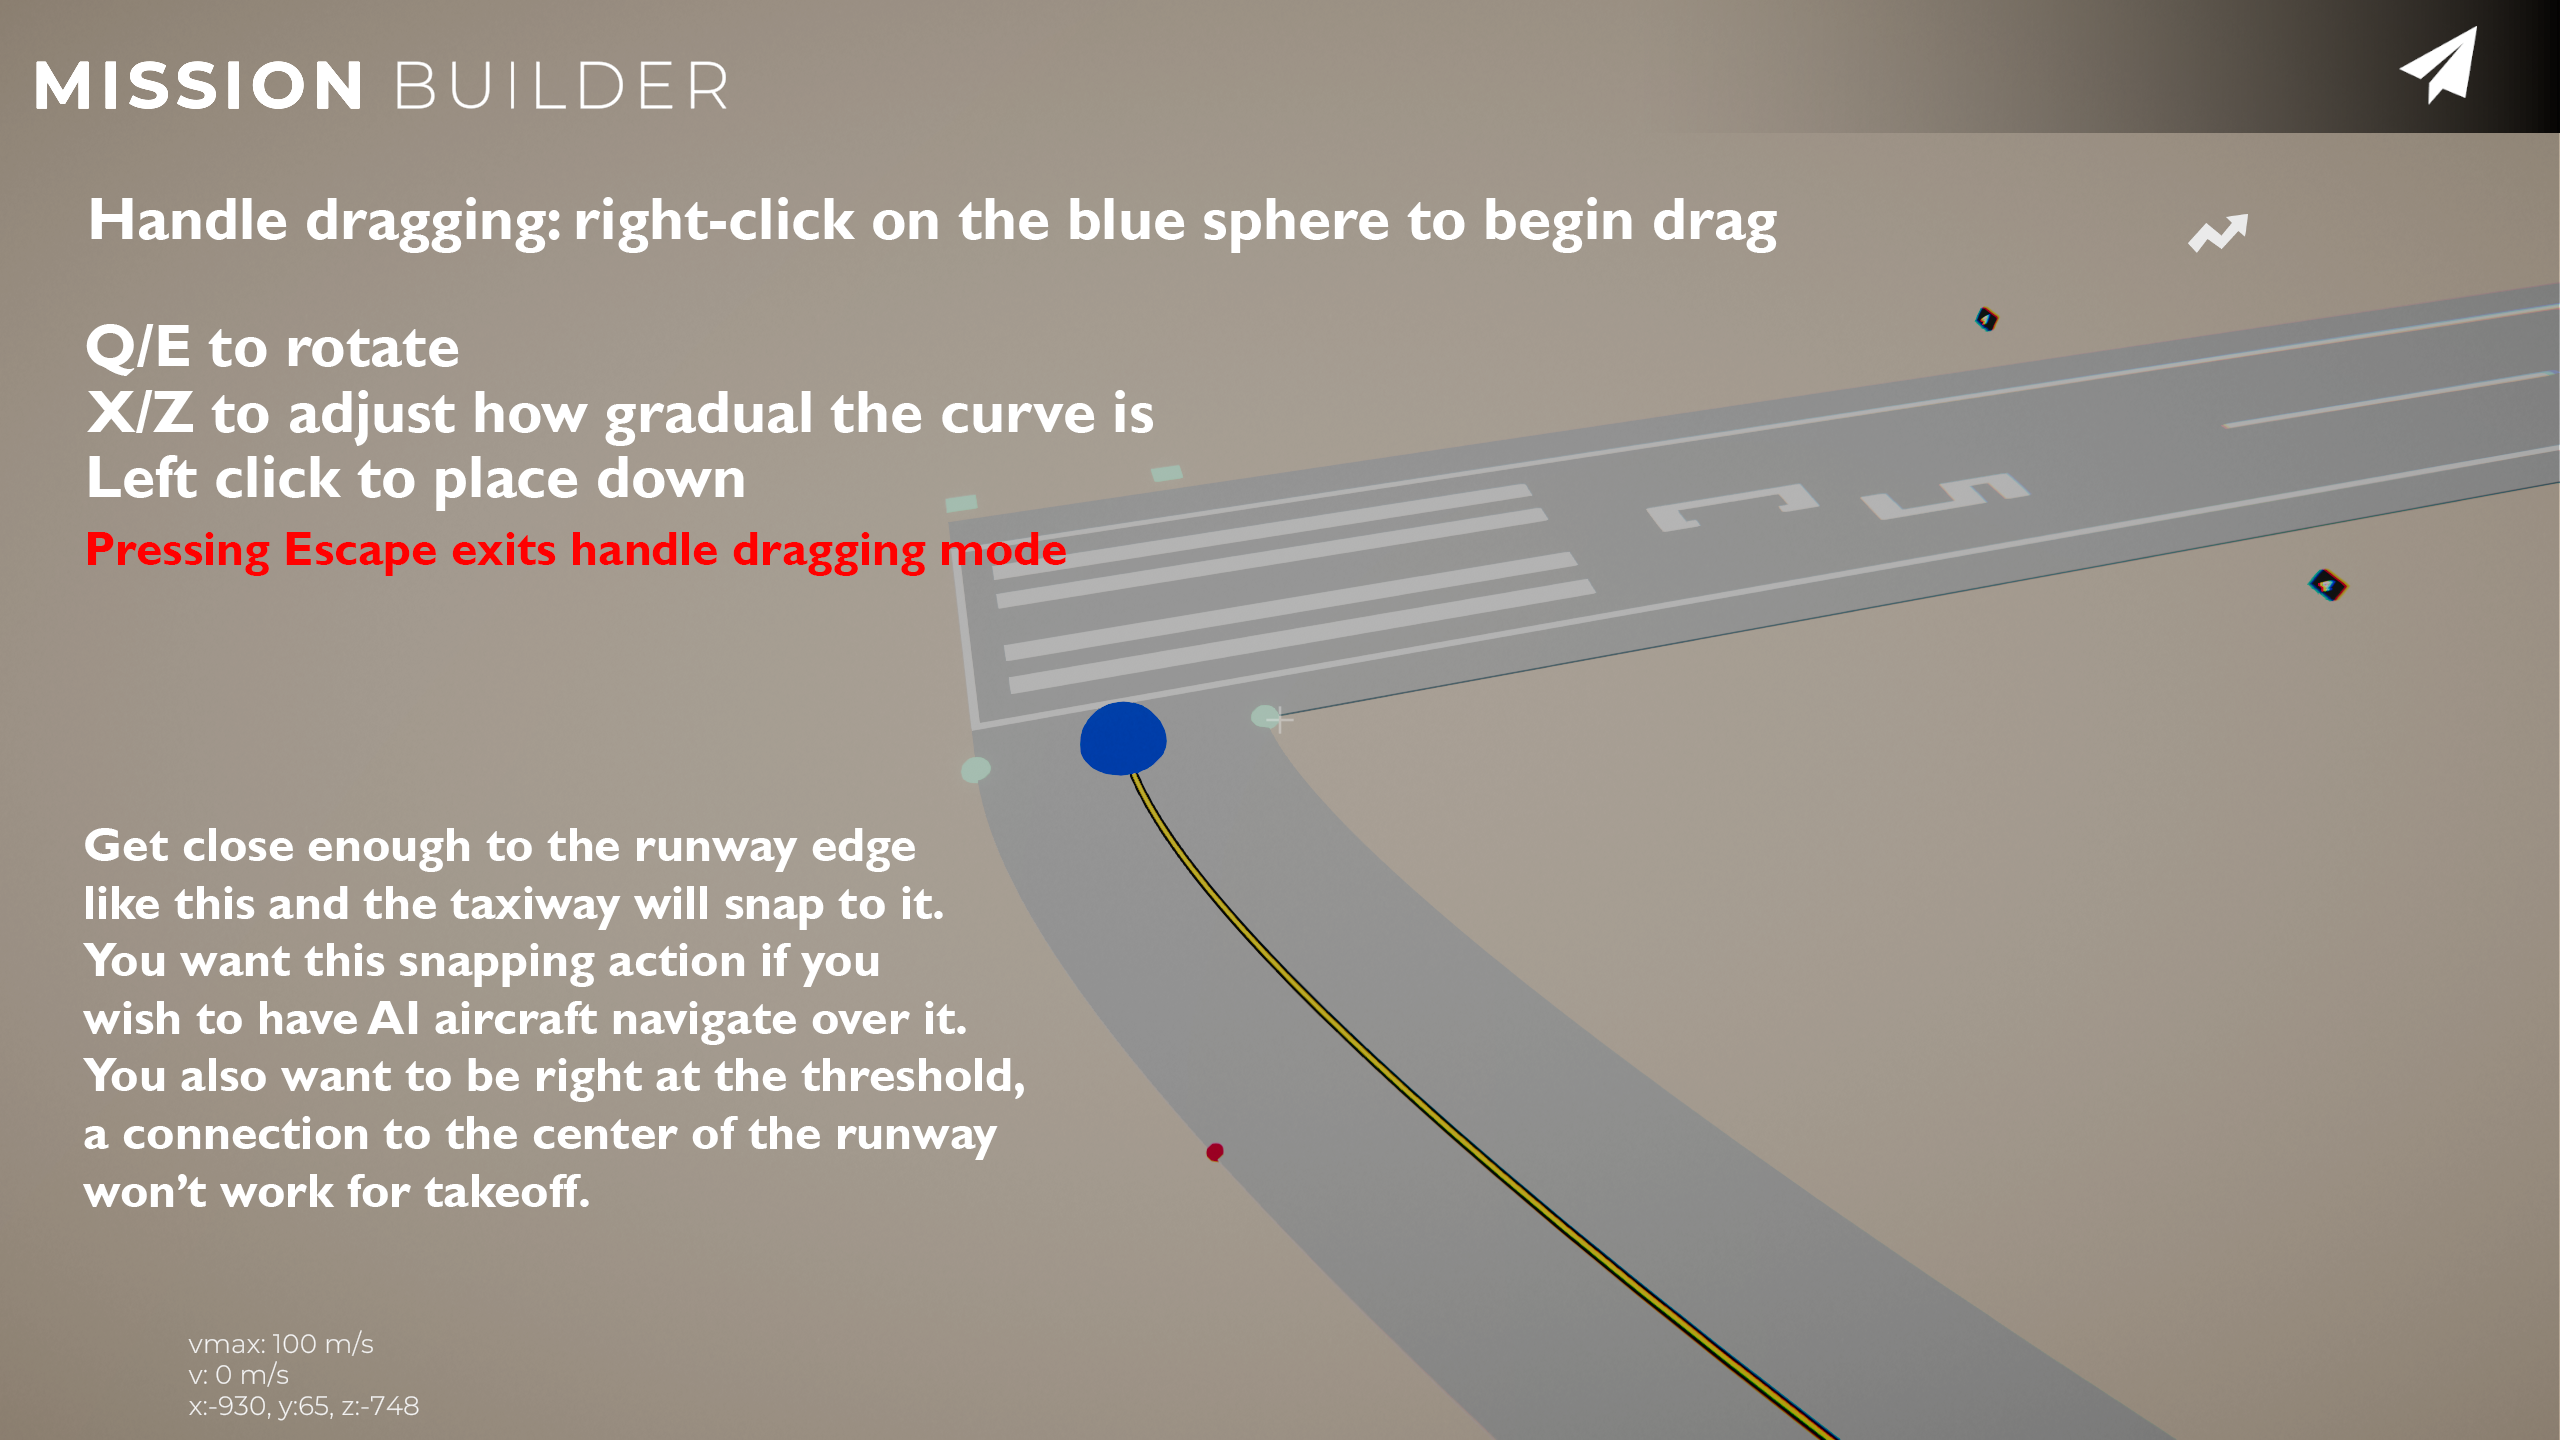
The blue spheres you see at either end of the taxiway are the control points. These control points allow you to shape the taxiway in any direction you like by dragging them. Right click on a blue sphere to drag that part of the taxiway. Left click to finish dragging. Q/E to rotate, X/Z to scale the curve. Handles will snap to runway thresholds and apron edges. To make a valid runway connection, drag one of the blue handles to the edge of the runway threshold and it will automatically snap. Make sure the tangent vector of the taxiway edge you're dragging aligns with the runway edge, rotate with Q/E until it does. You'll know you have a good snap when the corner of the taxiway perfectly lines up with the end of the runway as shown in the picture below.
Connecting the Apron
Having done the above, you can connect the other end of the taxiway with the apron by repeating the same process except connecting to the apron edge instead of the runway. Once again use Q/E to ensure the taxiway tangent vector aligns with the edge of whatever you're snapping to. Let it snap into place and your connection should be finished.
The green square gizmos see at the ends of the taxiway allow you to add new segments to the taxiway. I'd advise you to just keep it simple for now and not use these, but they should work and you can make a better looking connection if you wish to do so. I'll just use the two handles for this tutorial.
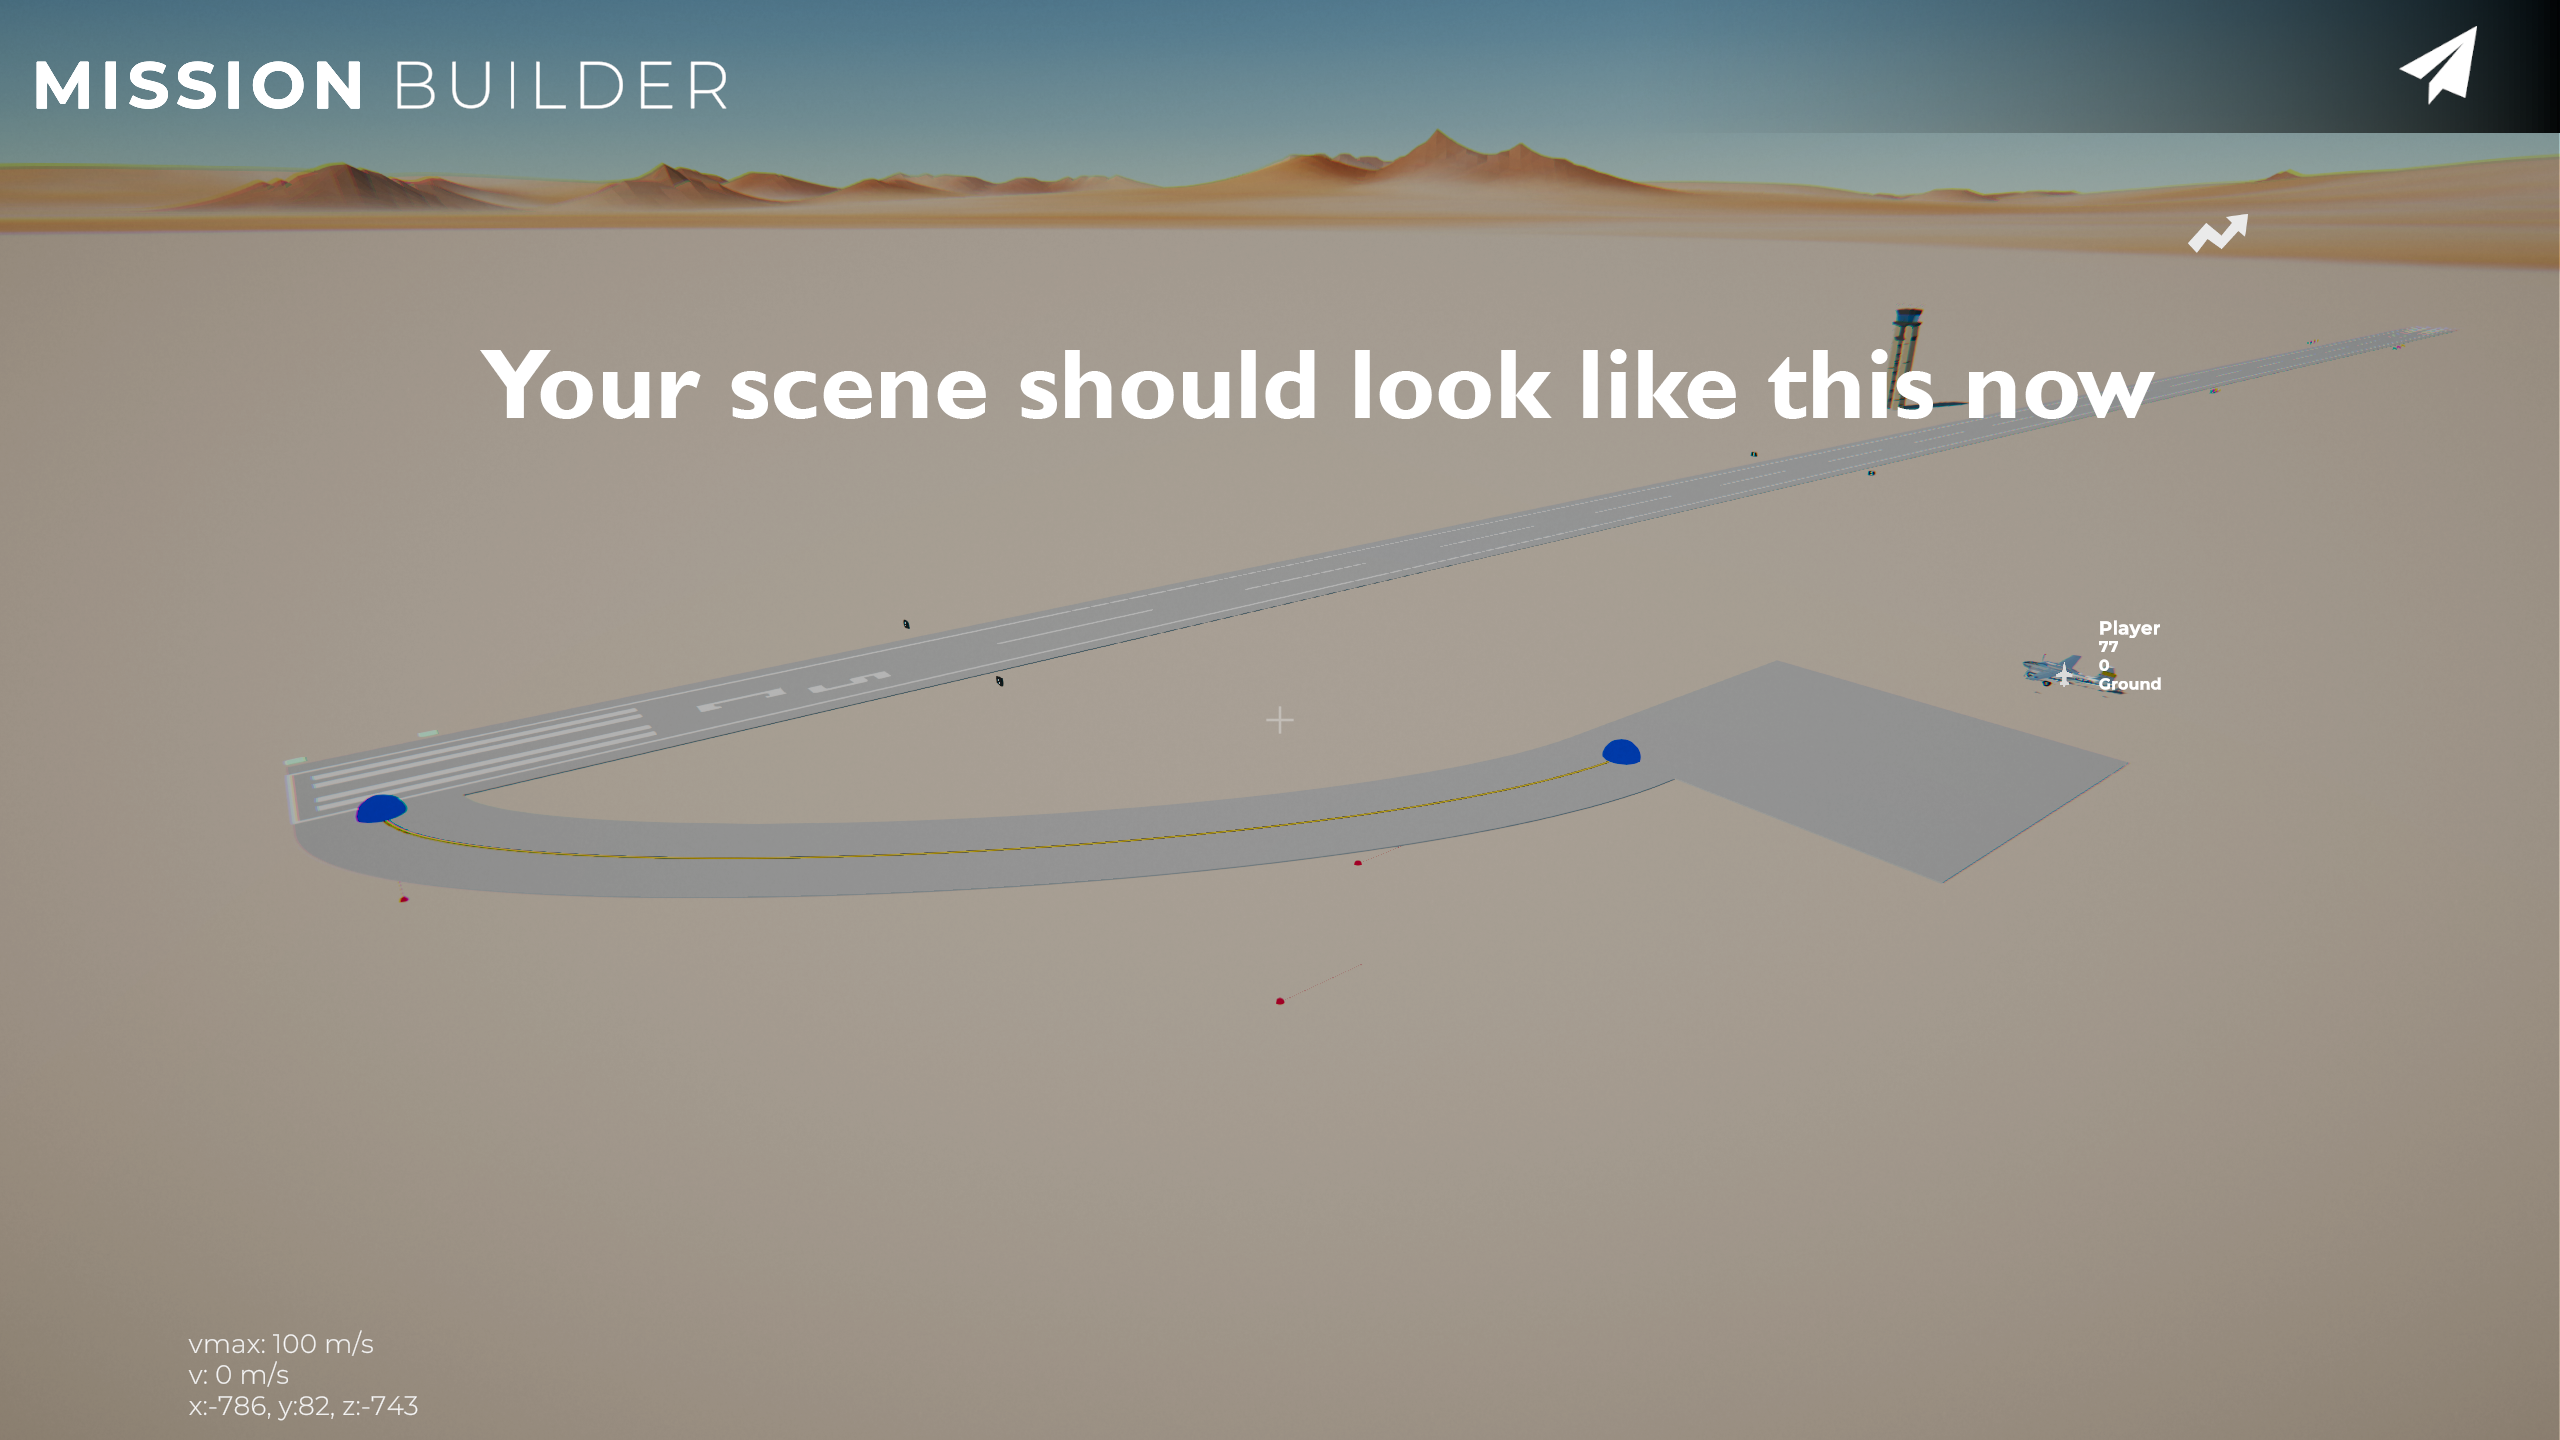 It's recommended to regularly press fly to save your mission.
Opening your Airport
To make the airport functional, you need one more critical thing: the airbase trigger. Go to the object database, click add trigger and place down (left click) the trigger near the center of your airport. Triggers are problematic and I recommend you save your mission beforehand or make a backup because improper use can break stuff. It won't break your mission or cause data loss, but it can cause problems with placing down other triggers that will require you to manually delete all triggers and their references in other files (dialogue or objectives, if any) from the mission's data files.
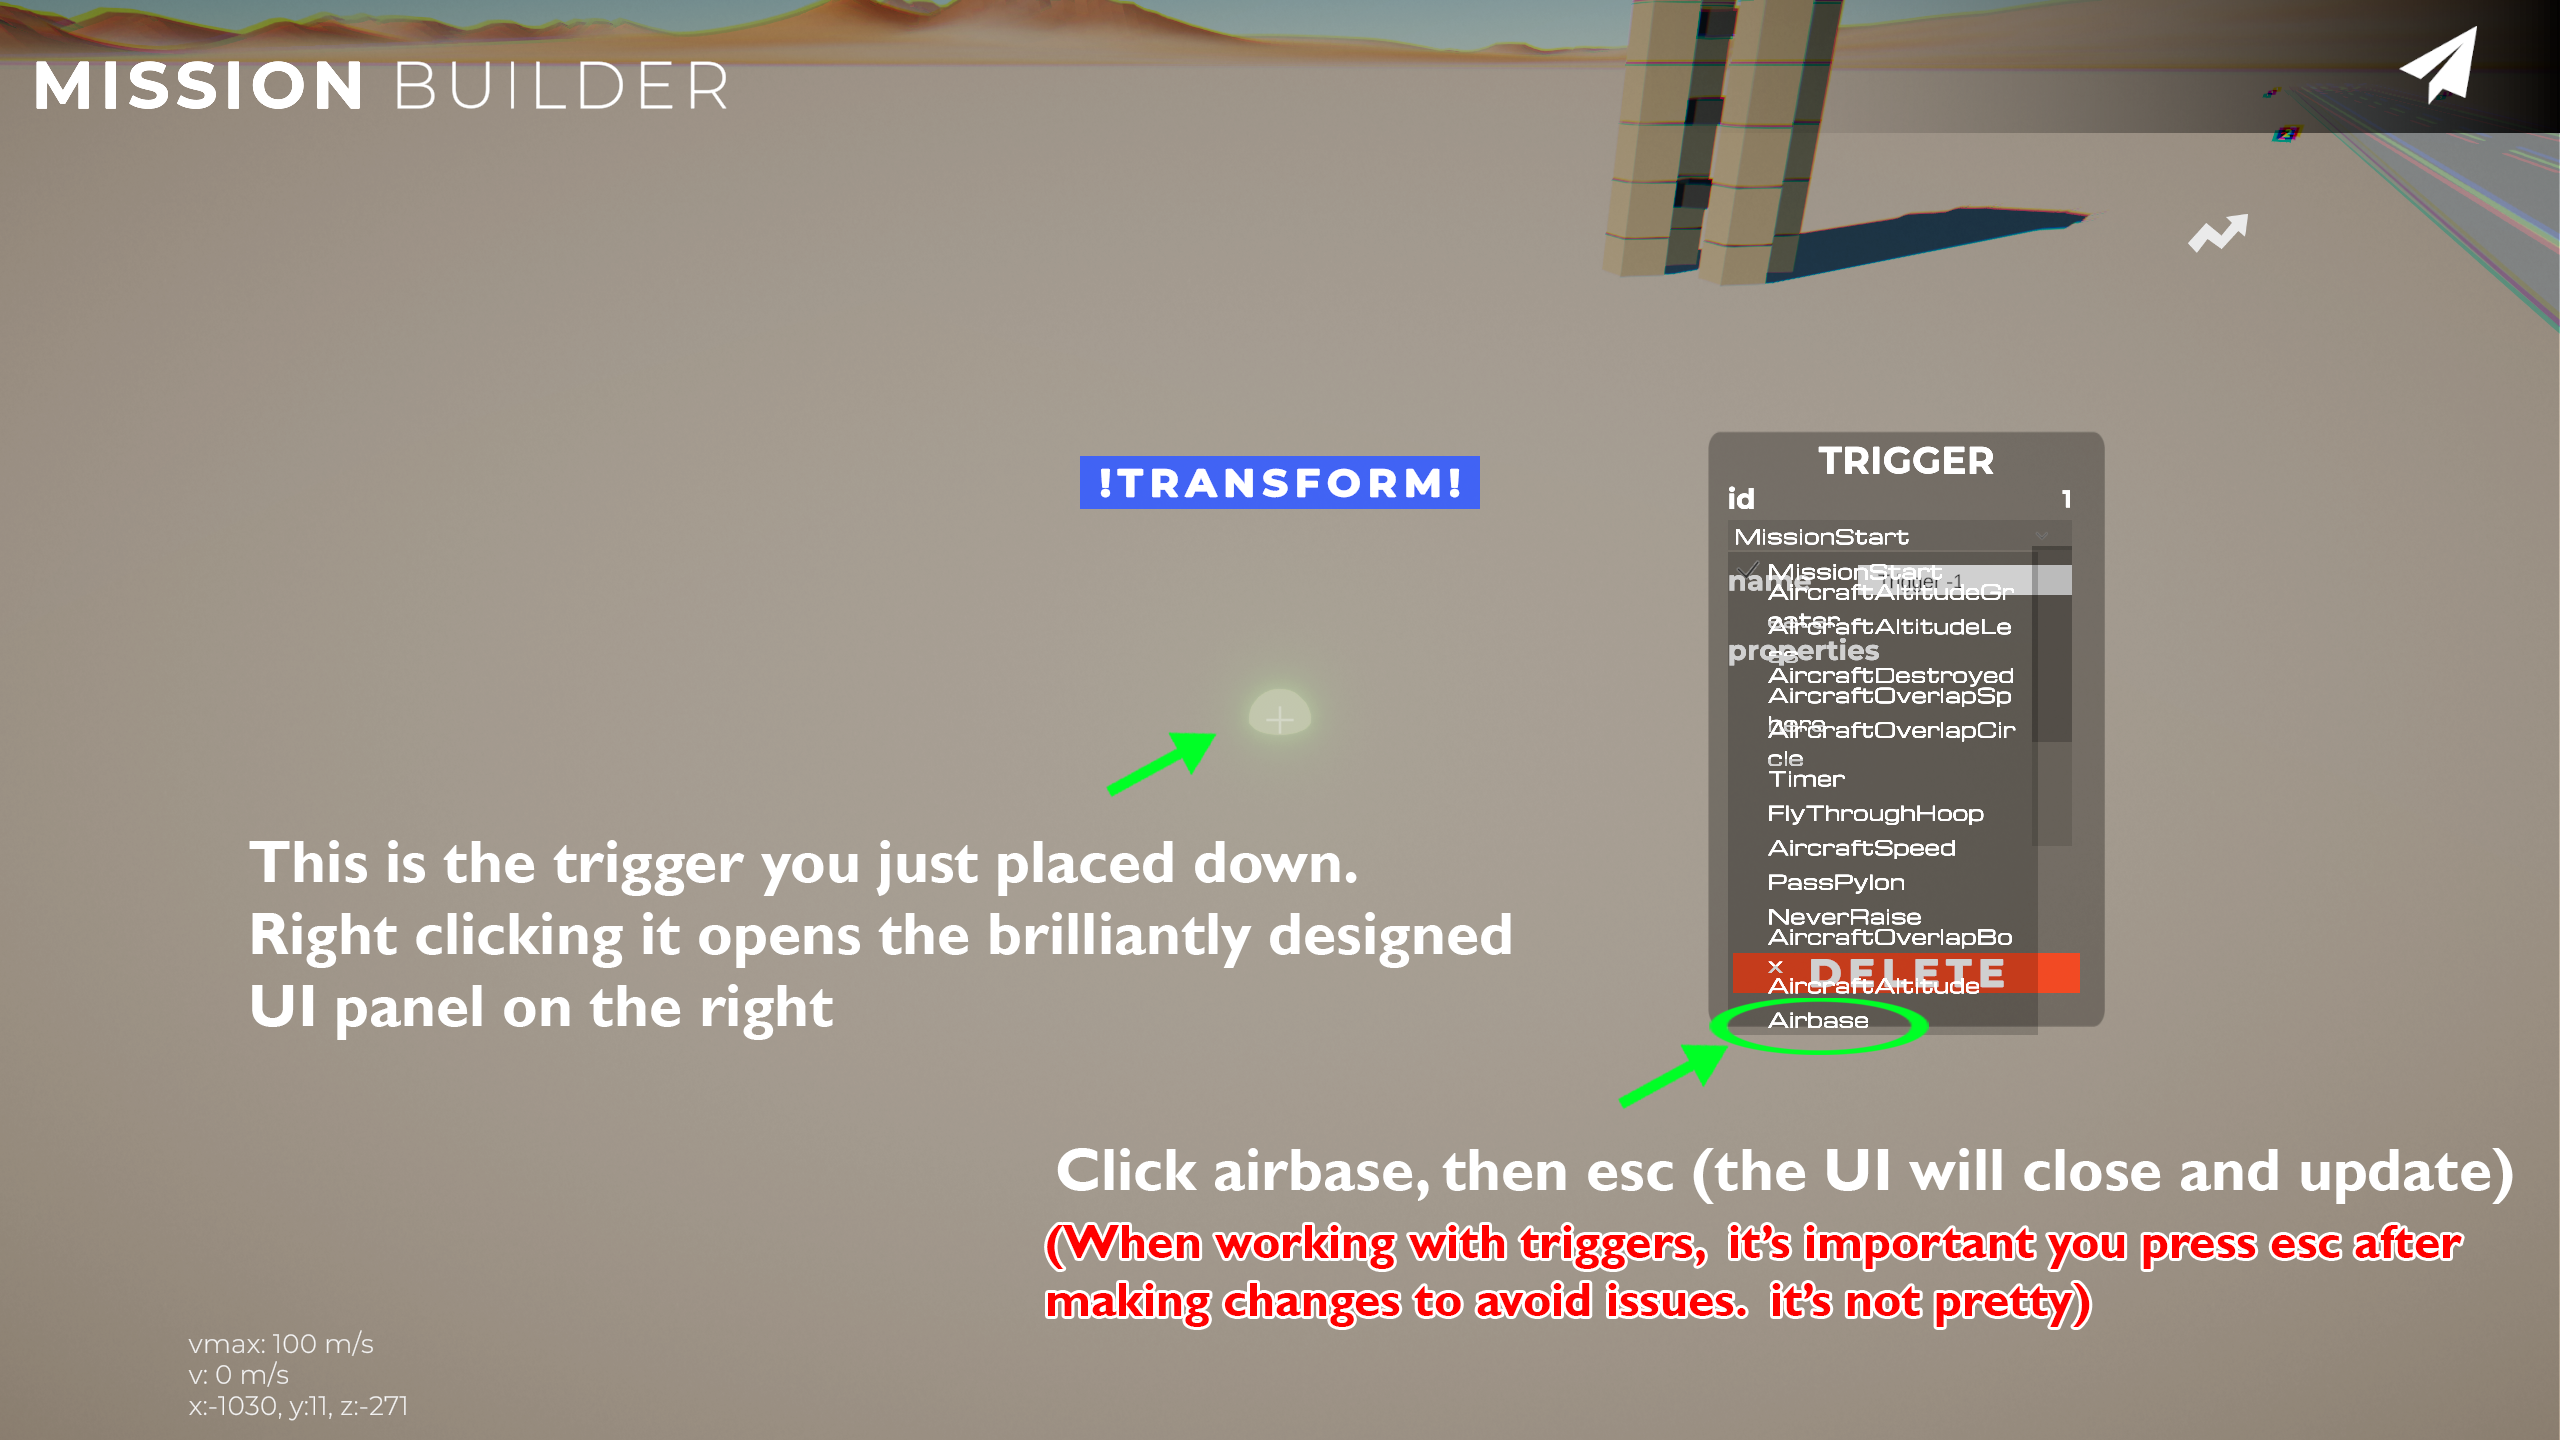
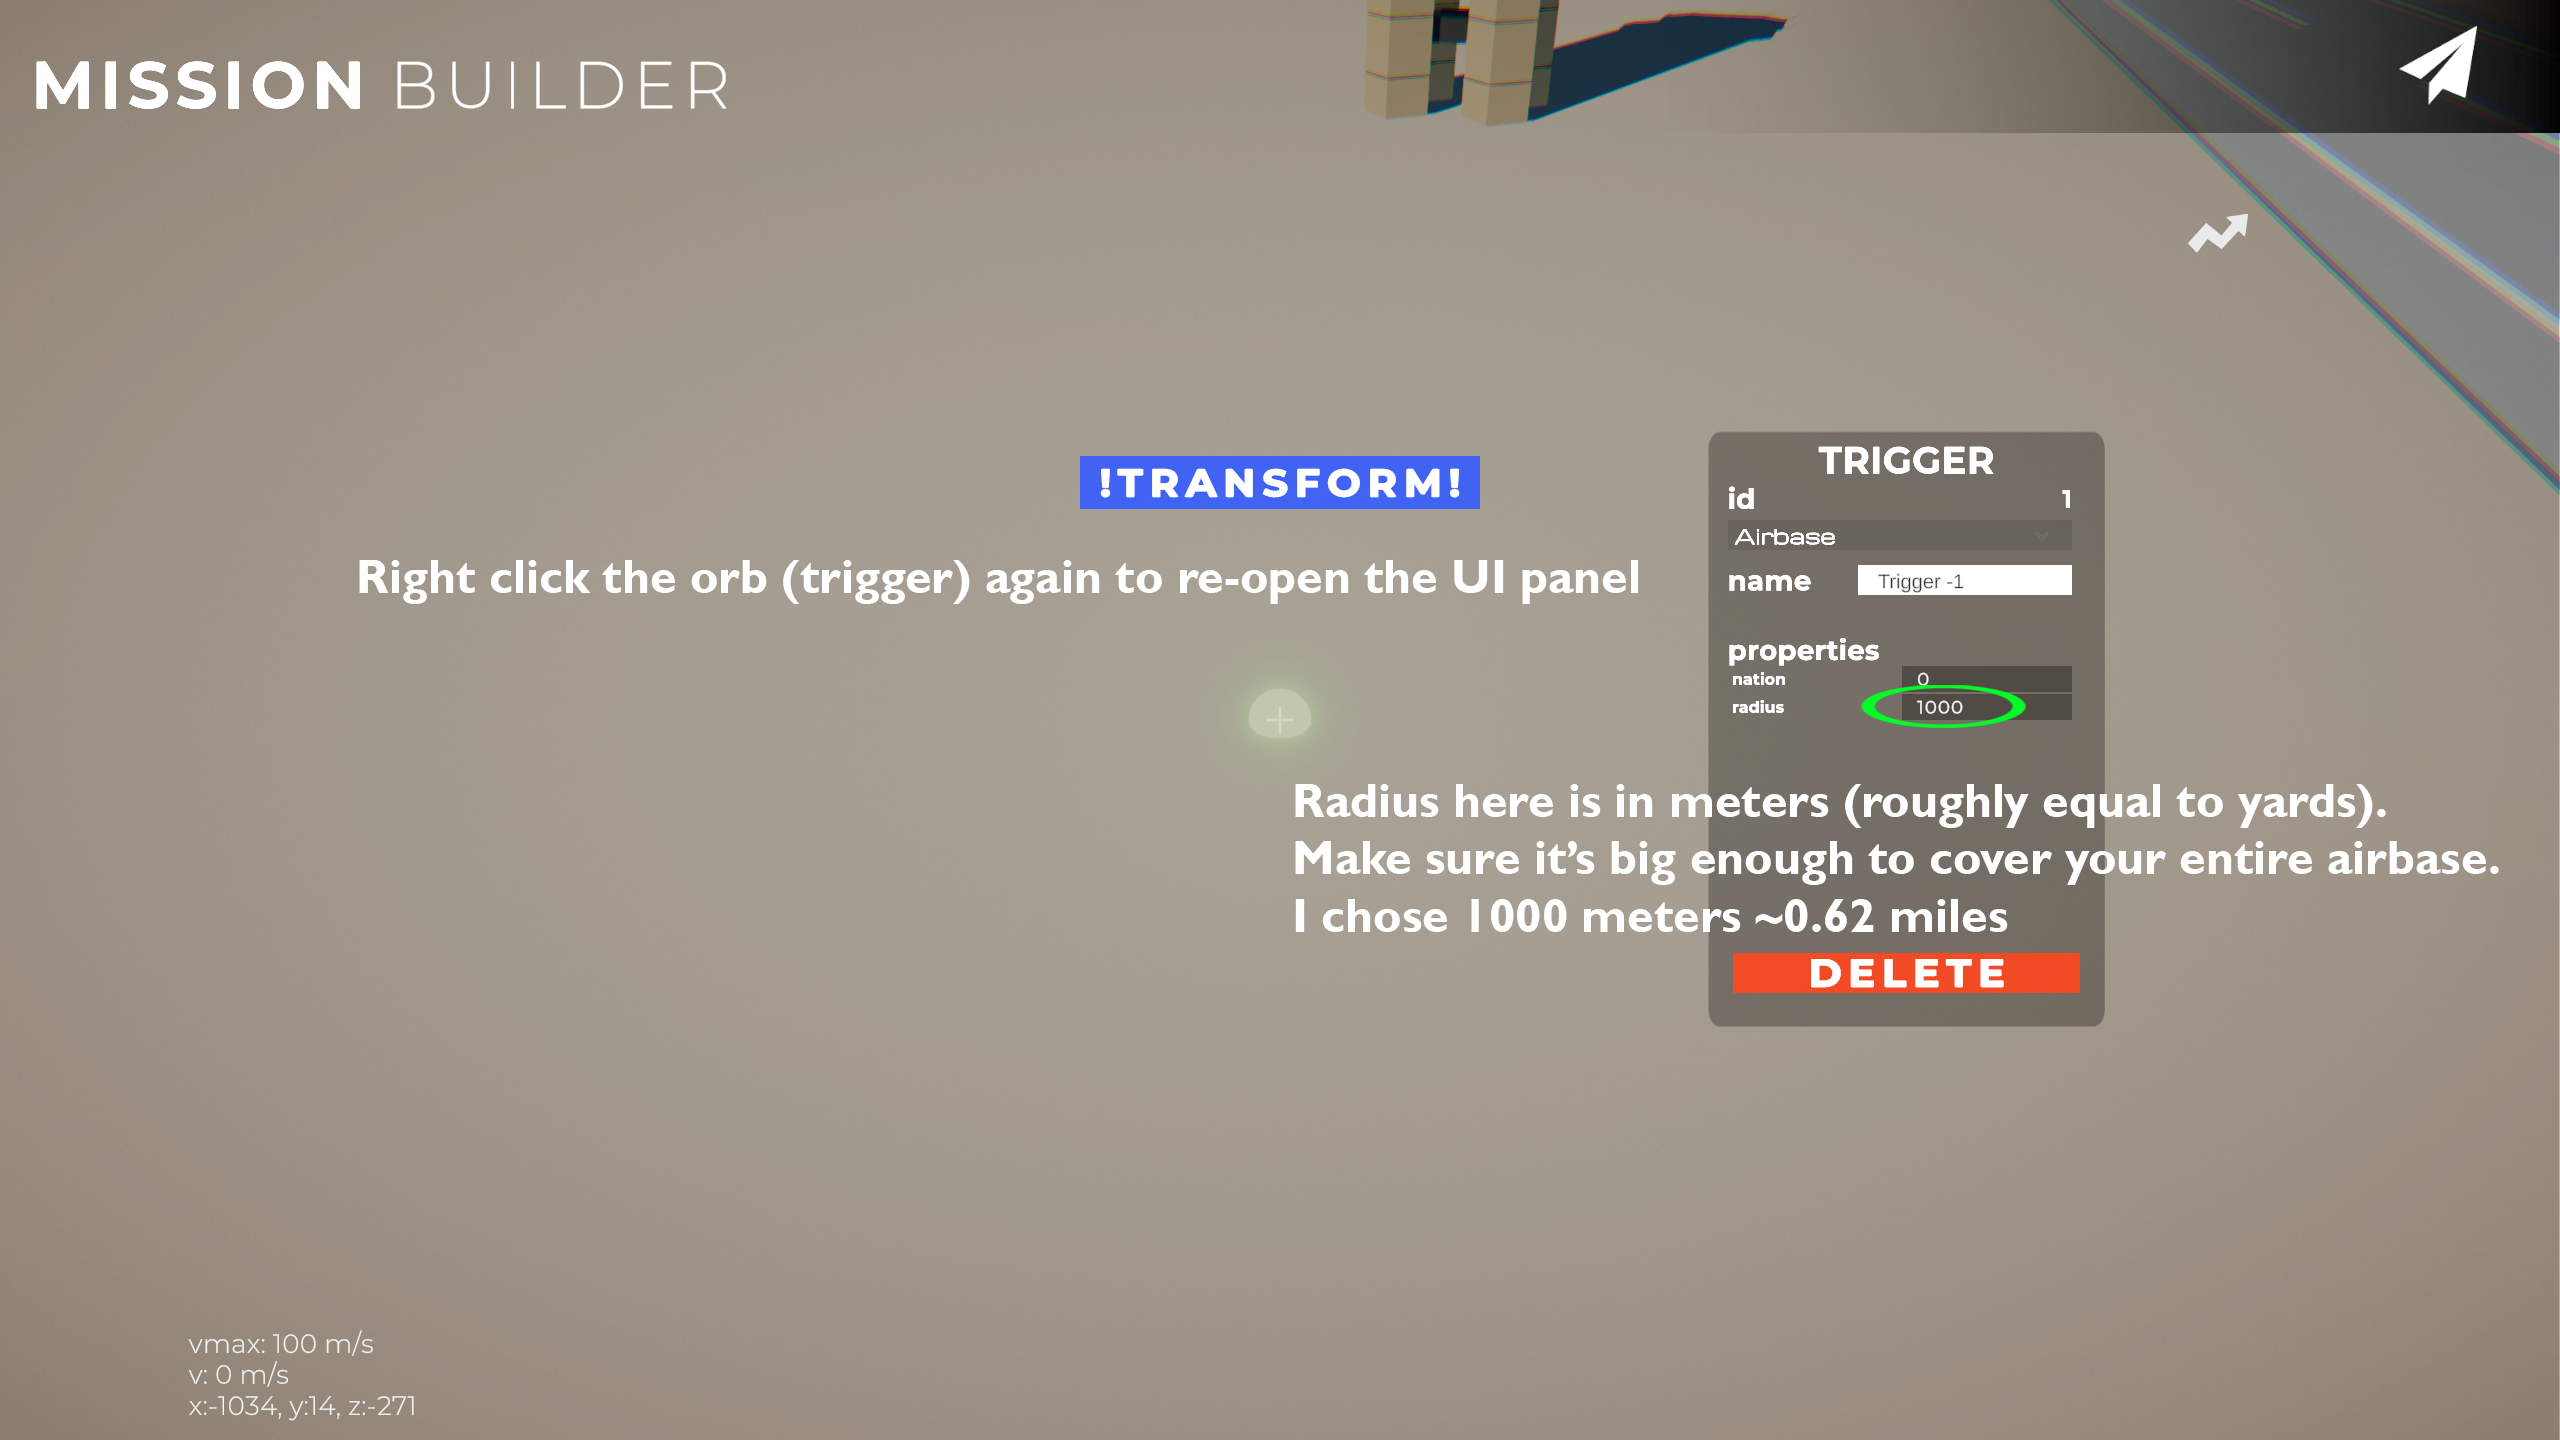
Ready for Action
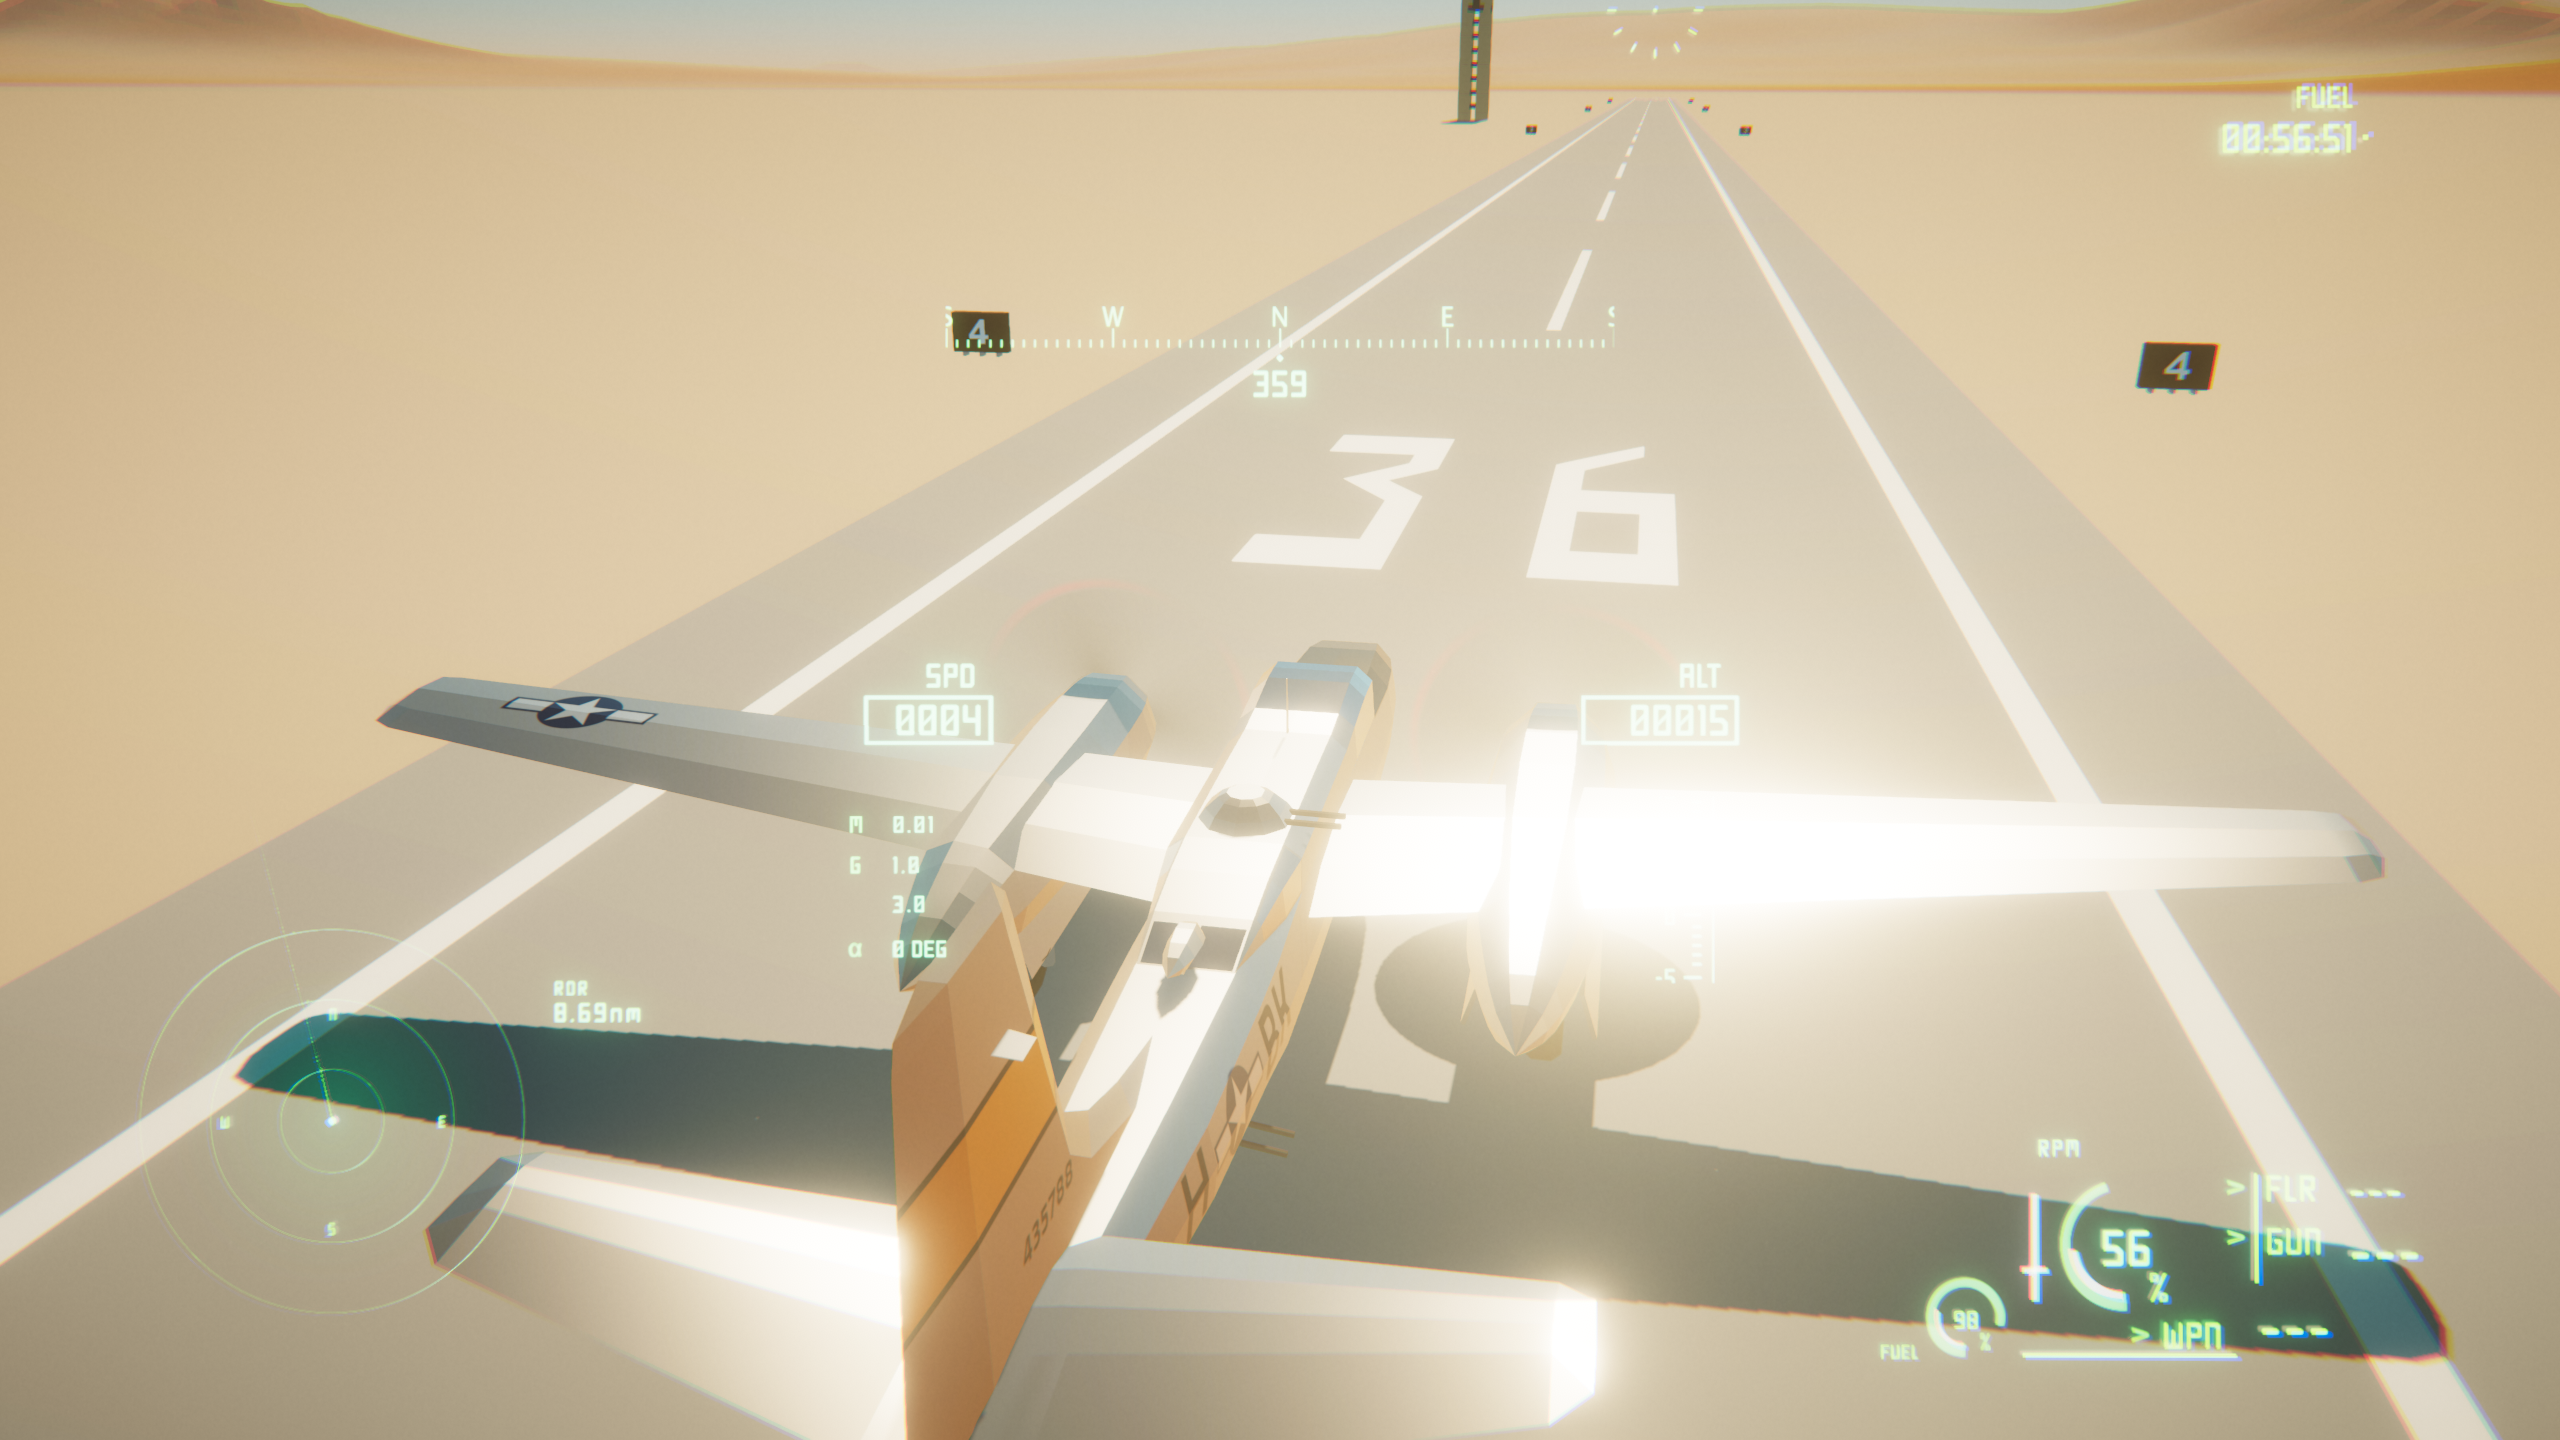
The airport is now ready for use by AI aircraft. You'll know the airport is "alive" when the markings on the runway become correct, as illustrated below. The proper heading is shown.
Adding an AI Aircraft
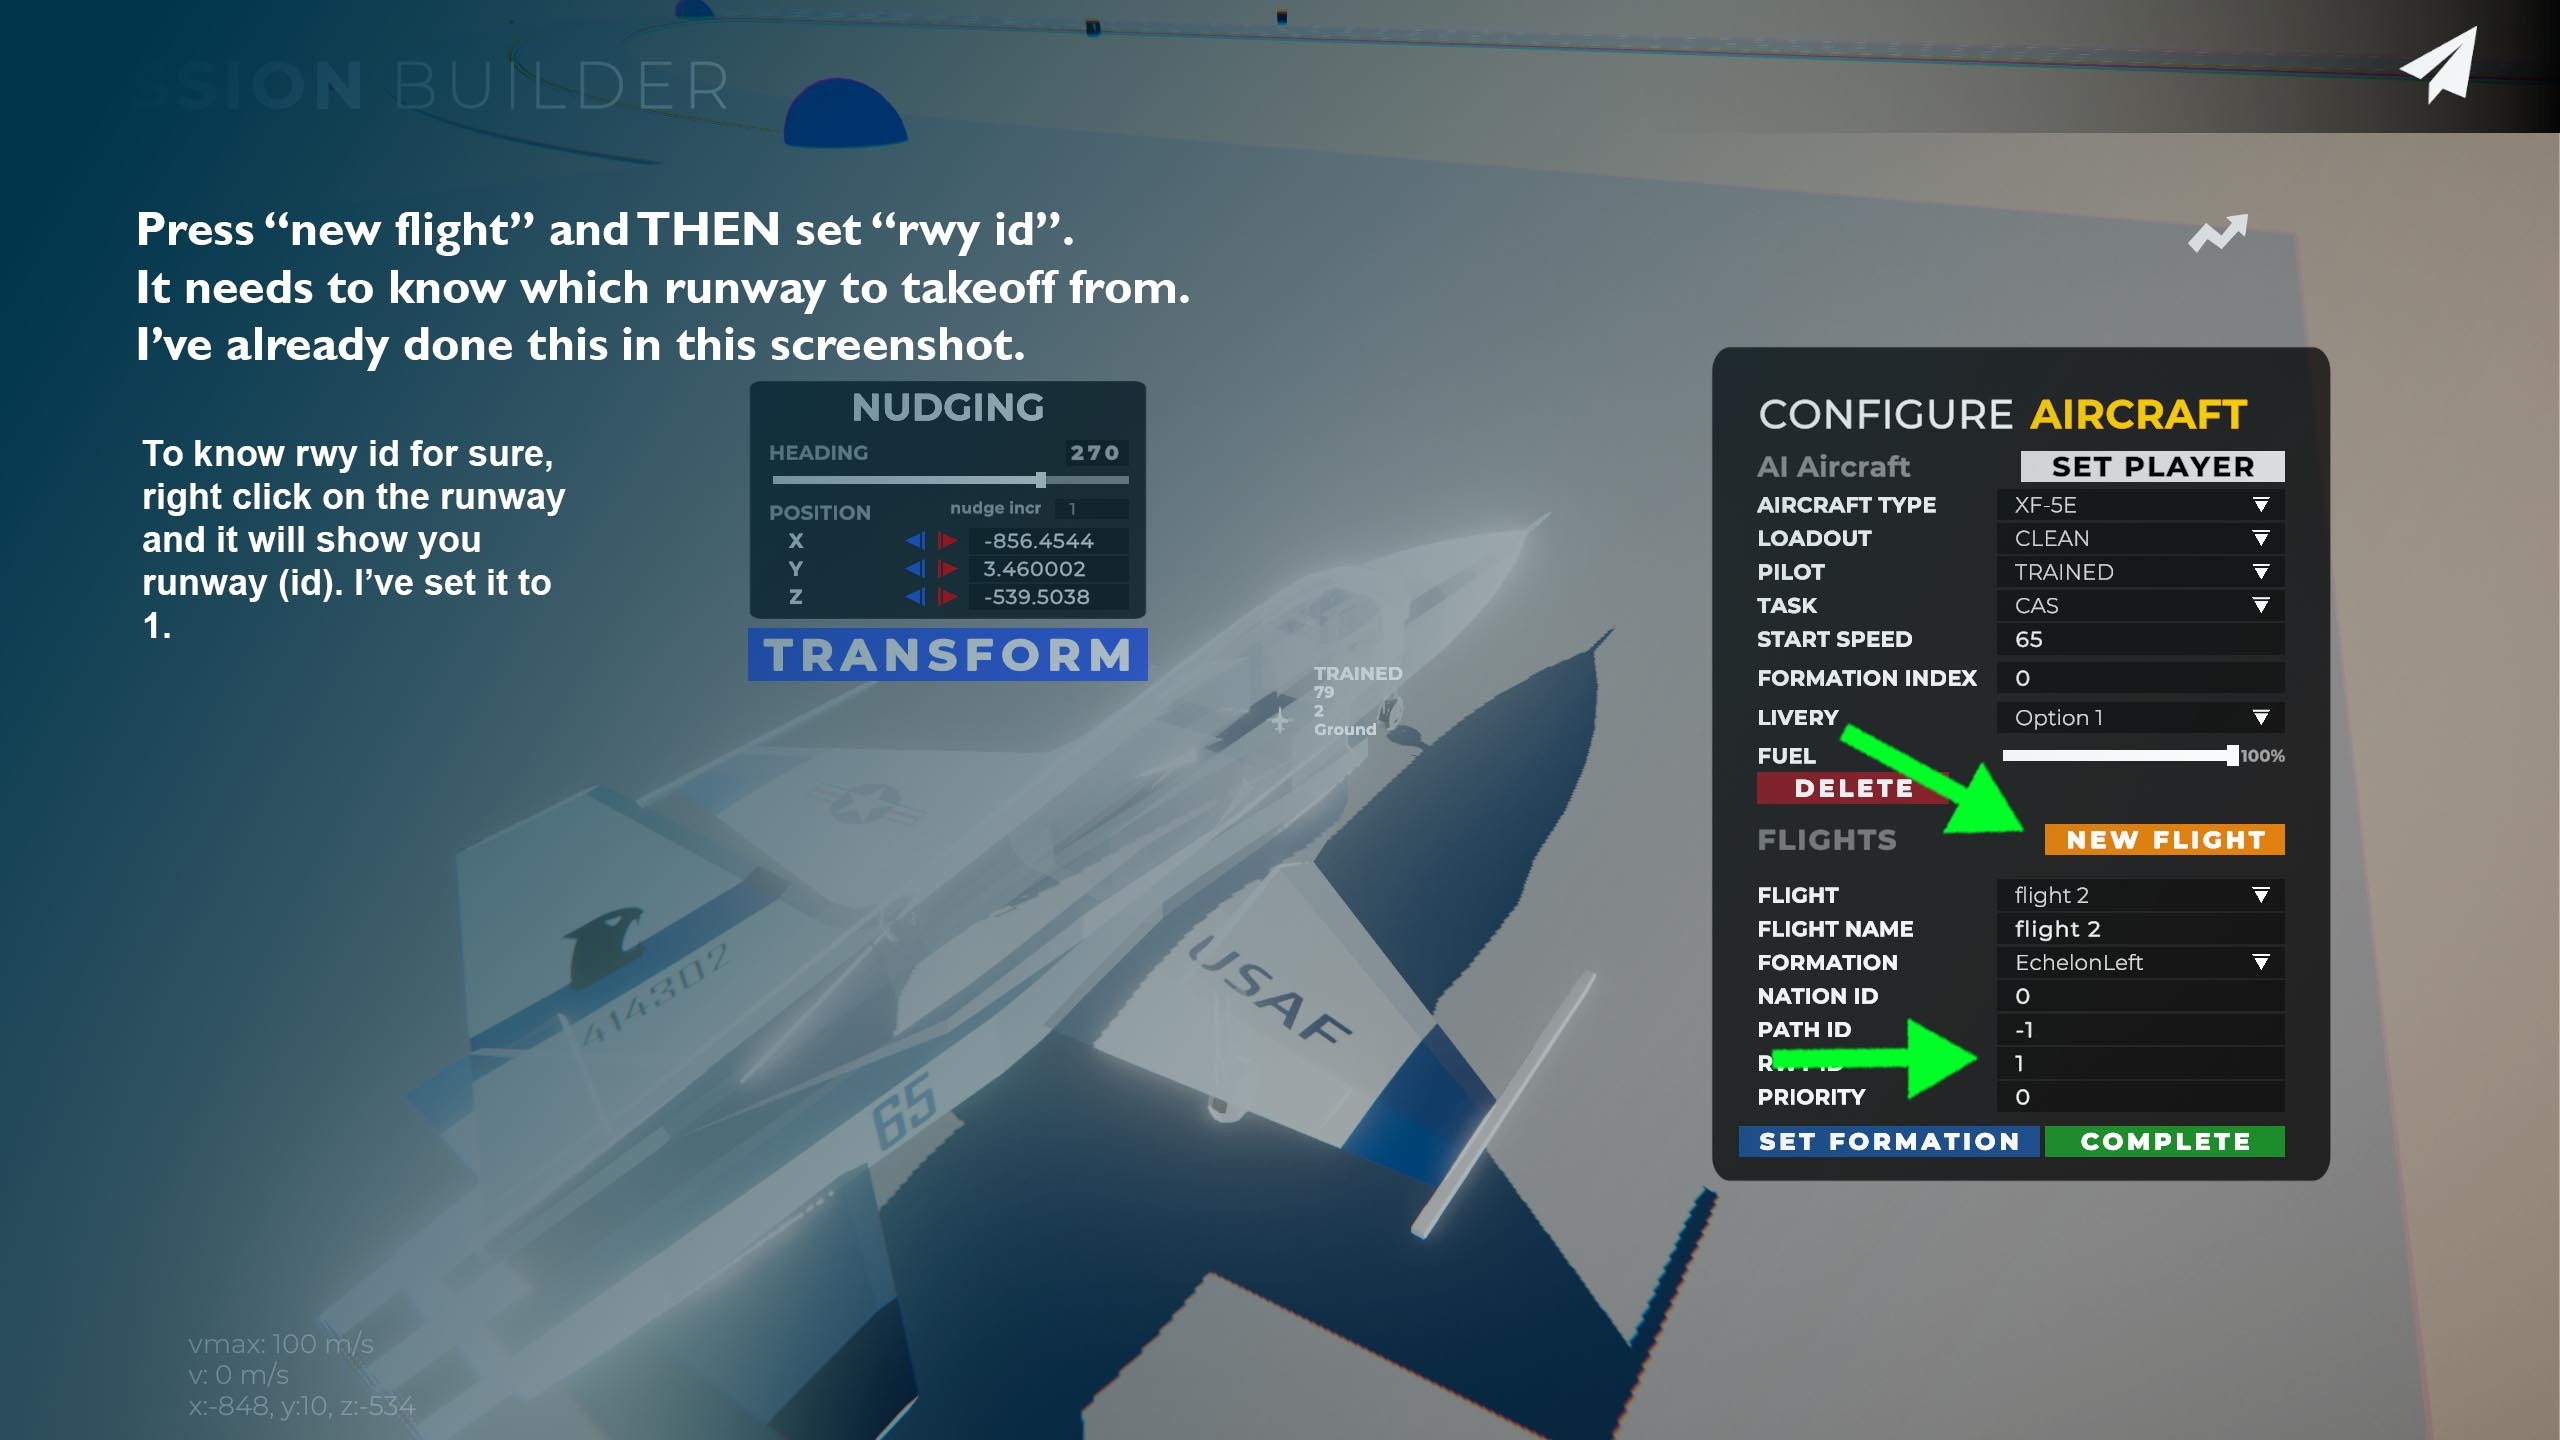
Keeping this as simple as possible with just one AI aircraft. Open the object database and add a plane. Caution here because not every aircraft is properly calibrated in terms of steering sensitivity. I recommend choosing either the XF-5E or XF-20 as these are optimized already. Drag the airplane and place it onto the apron at the far side with respect to the runway (shown below is where you should aim to place it), the gear should automatically extend when you place an aircraft on the ground so you'll know right away it's grounded. Use Q/E to orient while you drag to make sure the aircraft is pointing forwards like shown below. This is because the AI will taxi forward until it meets the extended imaginary line of the taxiway normal projected onto the apron.
Takeoff
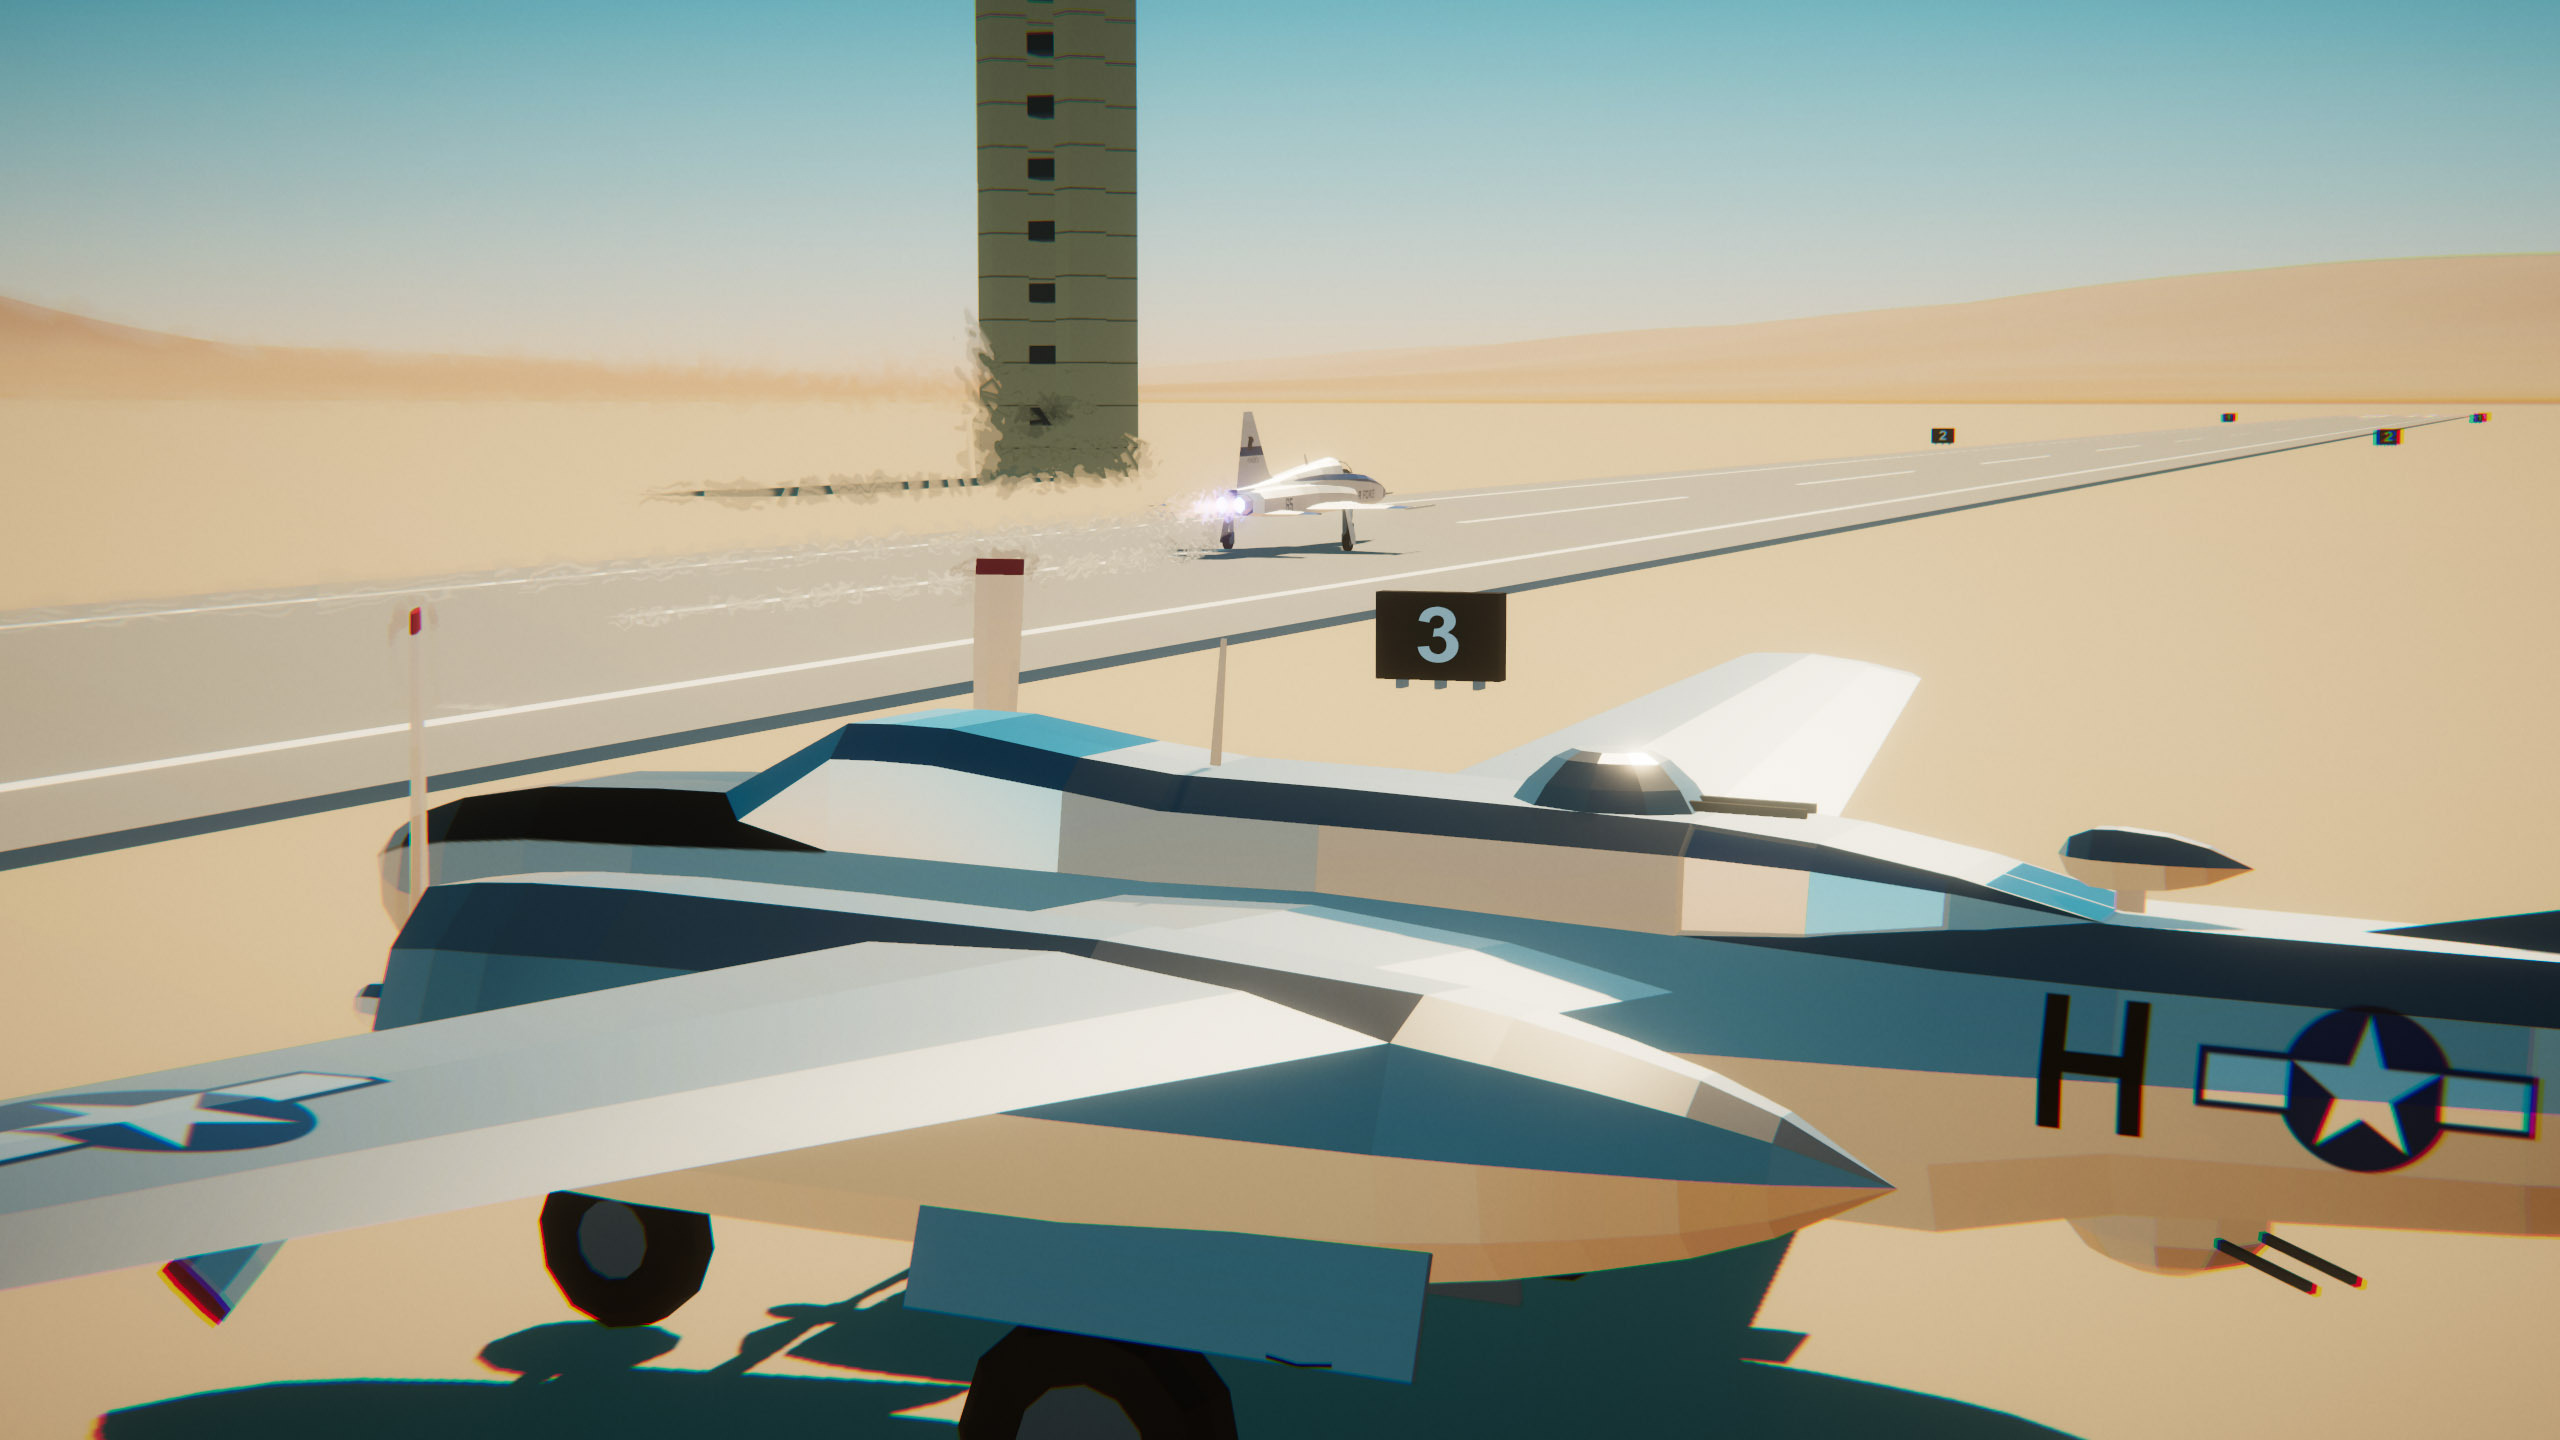
You should be good to go now. Press fly and witness the AI aircraft taxiing and then taking off.
If it isn't moving, try the following:
Change the flow of the runway from 0 to 1 or vice versa if you already set it.
Double check whether the AI has it's own flight that differs from the player.
Check that "RWY ID" for the AI's flight is set correctly.
Check if the airport is active by pressing fly and looking at the runway numbers.
Move out of the way (The AI will not move if you're located in a ~40m cone in front of it).
In Conclusion
What would of course make this all a lot simpler is better controls for dragging handles, more forgiving UI panels, etc. As said before there are many bugs that need fixing still. What would help for airports is some type of runtime visualization tool that shows you exactly the resulting graph that is created from your airport layout. This way you can know exactly where the problem lies if your AI aircraft aren't reaching the runway and whether the graph is to blame. I might get to it some day but fixing the mission builder is not high up my priority list compared with patching up the plane controls, gamemodes, weapons systems, etc. Anyways, I do hope this tutorial has been helpful in clearing things up. If you have any more questions, feel free
Extra Info
You can add waypoints by clicking the arrow icon in the top right, creating a new waypoint path, selecting it by pressing N and pressing Z to place new waypoints at your current position. X deletes a waypoint. To make AI follow the path after takeoff, you need to set the path id in the flight.
"Set formation" button forces each plane in a flight into formation position, according to each plane's formationIndex
For flights, formationIndex = 0 is the leader aircraft. Every plane needs a formationIndex that is unique. That index tells it where it is in the formation spatially.
Start speed is in m/s
For a waypoint, action = 1 means land. For those willing to go down that rabbit hole
All speeds everywhere are in m/s
Mission settings does basically nothing (sliders icon in sidebar)
Dialogue is the bell icon. You make broadcasts that are triggered by triggers
Mission logic is the target icon. Assign a primary objective by enabling the toggle to the right of an objective. Objectives are related to triggers. This is where the real problems with triggers begin so best to let it be for now.
You cannot change the map after you've created the mission.
The "nation" property of the airbase trigger affects everything in it's radius
Known Issues
Deleting an entity causes problems that can only be resolved by pressing fly or exiting the mission builder.
Triggers will actively bug out if you add more of them, caution advised
Problems were reported with spawning flights of TY-95, TY-4 and EB-35B, as well as line astern formations
AI aircraft cannot navigate across aprons. For an AI aircraft to reach the runway, there needs to be a connection to the runway threshold that does not go over any aprons except for the one the AI aircraft started on. Which threshold the AI chooses (and thus the direction of takeoff) is set by the "flow" variable of the runway. Flow is either 0 or 1, nothing else. If your aircraft does not taxi to the runway but you are sure there is a connection to the runway threshold, perhaps the threshold it is attempting to taxi to is not directly connected by taxiway. Flip the flow to be sure.